
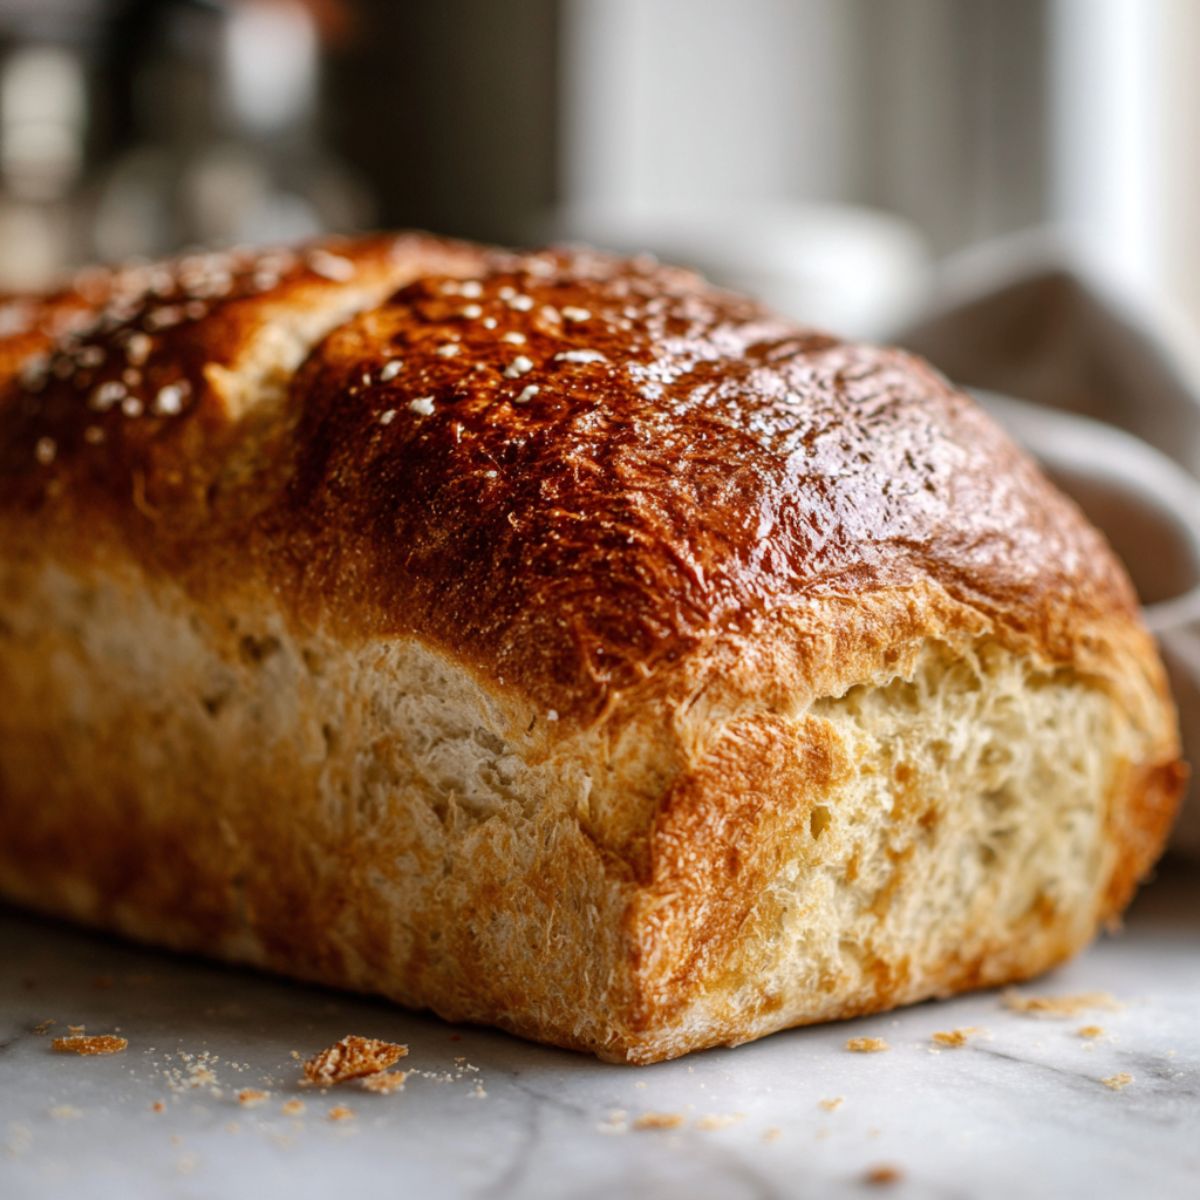
There's something magical about pulling a golden loaf of honey bread recipe from your oven. The smell fills your kitchen, and that first warm slice with butter? Pure comfort. I've been baking this bread for years, and it never gets old.
This honey bread recipe is what you need when store-bought just won't cut it. It's soft, slightly sweet, and works for everything from morning toast to a hearty breakfast or even afternoon sandwiches. Plus, it's way easier than you think; no fancy skills required.
Why This Sweet Honey Bread Wins Every Time
Honey bread has been around for generations because it just works. The natural sweetness from honey keeps the loaf moist for days, which means less waste and more enjoyment. Unlike regular white bread, this honey bread recipe creates a tender crumb that doesn't dry out by day two.
What makes this homemade honey bread special is its versatility. Serve it warm with honey butter for breakfast, use it for grilled cheese at lunch, or toast it for a quick snack. It pairs beautifully with soups, works as sandwich bread, and even makes fantastic French toast. This honey bread recipe has become my go-to for both weekday meals and weekend baking projects.
Jump to:
Ingredients
- All-purpose flour
- Active dry yeast
- Honey
- Warm milk (110°F)
- Melted butter
- Salt
- Egg
- Optional toppings:
- Oats or seeds (for texture and visual appeal)
- Honey (for brushing the top)
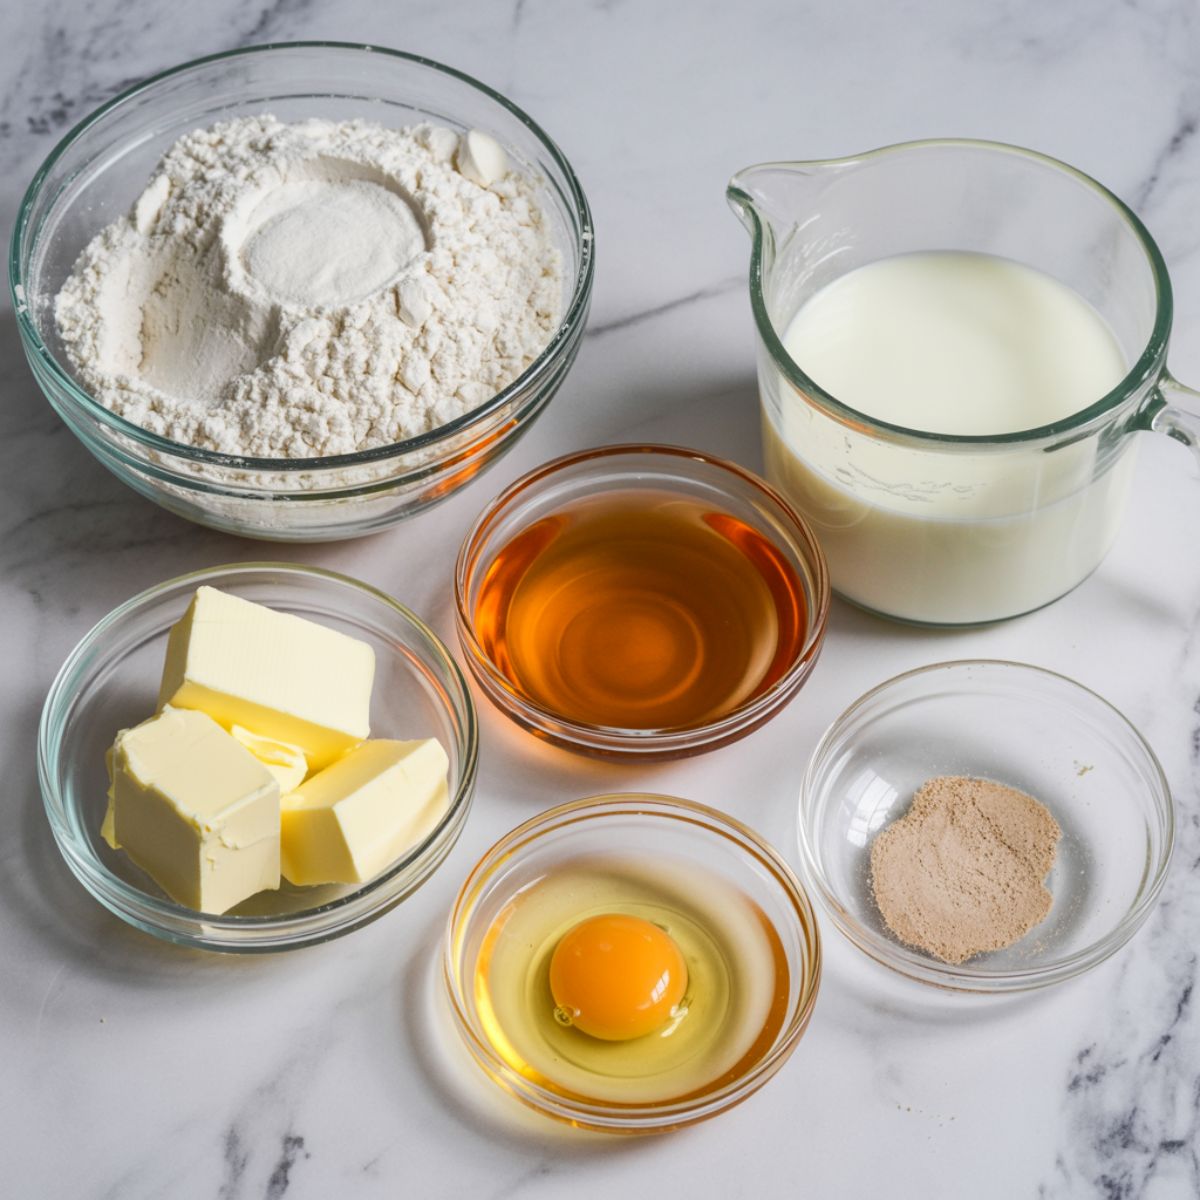
See recipe card for quantities.
Instructions
Activate Your Yeast
- Pour warm milk into a large mixing bowl
- Add honey and stir until dissolved
- Sprinkle yeast over the milk mixture
- Let it sit for 5-10 minutes until foamy (this means your yeast is alive and ready)
- If nothing happens, your milk might be too hot; start over with fresh yeast
Mix the Dough
- Add melted butter, egg, and salt to your yeast mixture
- Stir everything together with a wooden spoon
- Gradually add flour, one cup at a time
- Mix until a shaggy dough forms
- Turn the dough onto a floured surface and knead for 8-10 minutes
- The dough should feel smooth and slightly tacky, not sticky
Let It Rise
- Place dough in a greased bowl and cover with a damp kitchen towel
- Set in a warm spot for 60-90 minutes
- The dough should double in size
- Press your finger into the dough; if the indent stays, it's ready
- Punch down the dough to release air bubbles
Shape and Second Rise
- Roll dough into a rectangle about 9 inches wide
- Roll tightly from the short end, like a jelly roll
- Pinch the seam to seal
- Place seam-side down in a greased 9x5-inch loaf pan
- Cover and let rise for 30-45 minutes until it crowns above the pan
- Preheat your oven to 350°F during this time
- Brush the top with honey for a beautiful golden crust
Bake to Perfection
- Transfer to a wire rack to cool completely before slicing
- Bake for 30-35 minutes until golden brown
- The internal temperature should reach 190°F
- Tap the bottom; it should sound hollow
- Remove from oven and brush with more honey if you want extra sweetness
- Let cool in the pan for 10 minutes
Expert Cooking Tips
Temperature Matters for Your Honey Bread Recipe
- Getting your milk temperature right is crucial. Too hot (above 120°F) and you'll kill the yeast. Too cold (below 100°F) and it won't activate properly. I keep an instant-read thermometer handy, but you can also test it on your wrist; it should feel warm, not hot.
Kneading Techniques
- Don't skip the kneading step. This develops the gluten that gives bread its structure. Use the heel of your hand to push the dough away, fold it back, turn it a quarter turn, and repeat. Your arms might get tired, but the workout is worth it for that perfect texture.
Rise Time Flexibility
- If your kitchen is cold, the dough will take longer to rise. Place the bowl in your oven (turned off) with a pan of hot water underneath. This creates a warm, humid environment that yeast loves. In summer, my dough rises faster, sometimes in just 45 minutes.
Check for Doneness
- Visual cues aren't always reliable. Invest in an instant-read thermometer and aim for 190°F in the center. This takes the guesswork out of baking and prevents undercooked or overbaked loaves.
Flour Measurement
- Spoon flour into your measuring cup and level it off with a knife. Don't scoop directly from the bag, which packs in too much flour and creates dense bread. Too much flour is the most common mistake I see in homemade bread baking.
Recipe Variations & Substitutions
Make It Whole Wheat
- Replace half the all-purpose flour with whole wheat flour for a nuttier flavor and extra fiber. Add an extra tablespoon of milk since whole wheat absorbs more liquid. This creates a heartier honey wheat bread that's perfect for sandwiches.
Go Dairy-Free
- Swap regular milk for almond, oat, or soy milk. Replace butter with coconut oil or vegan butter. The honey bread recipe works beautifully with these substitutions, though the flavor will be slightly different. I've made this variation dozens of times for lactose-intolerant friends.
Add Mix-Ins
- Honey oat bread: Add ½ cup rolled oats to the dough for texture
- Cinnamon swirl: Brush the rolled dough with butter, sprinkle with cinnamon sugar, then roll and bake
- Herb version: Add rosemary and reduce honey to 2 tablespoons for a savory twist
- Seeds and nuts: Fold in sunflower seeds, flax seeds, or chopped walnuts
Reduce Sweetness
- Cut the honey to 2 tablespoons if you prefer less sweet bread. The bread will still turn out soft and delicious. This version works better for savory sandwiches and pairs well with soups and stews.
Make It Gluten-Free
- Use a 1:1 gluten-free flour blend with xanthan gum. The texture will be slightly different but still delicious. Let the dough rest longer (90-120 minutes) for the first rise.
Equipment Recommendations
- 9x5-inch loaf pan ; the standard size for this honey bread recipe, creates perfectly shaped slices
- Stand mixer with dough hook ; saves your arms from kneading (though hand-kneading works great too)
- Kitchen thermometer ; takes the guesswork out of milk temperature and doneness
- Damp kitchen towel ; keeps dough moist during rising, prevents a dry crust from forming
- Wire cooling rack ; allows air circulation so the bottom doesn't get soggy
- Pastry brush ; perfect for applying that honey glaze on top
- Large mixing bowl ; gives dough room to double without spilling over
You don't need expensive equipment to make amazing bread. A basic loaf pan from the dollar store works just as well as a fancy one. The most important tool is your hands and a little patience.
Storage & Meal Prep Tips
Fridge Storage
- Wrap cooled honey bread recipe in plastic wrap or store in an airtight container. It stays fresh at room temperature for 3-4 days. Don't refrigerate; it actually makes bread go stale faster. Keep it on your counter away from direct sunlight.
Freezing Instructions
- Slice the bread before freezing for easy grab-and-go pieces. Wrap the whole loaf or individual slices in plastic wrap, then aluminum foil. Freeze for up to 3 months. Thaw at room temperature for an hour, or toast frozen slices directly from the freezer.
Make-Ahead Options
- Prepare the dough the night before and let it rise slowly in the refrigerator overnight. Shape it in the morning, let it come to room temperature for 30 minutes, then do the second rise and bake. This develops even more flavor and fits busy schedules.
The Golden Rule That Changes Everything
Here's what years of baking taught me: never slice your honey bread recipe right out of the oven. I know it's tempting, and the smell is incredible, but cutting into hot bread releases steam that makes it gummy inside. Let it cool for at least 30 minutes, ideally an hour. The texture transforms as it cools, becoming that perfect soft, sliceable consistency you want.
The second game-changer? Brush the top with honey immediately after baking. This creates a gorgeous glossy finish and adds an extra layer of sweetness. My grandmother did this with her honey bread recipe, and it's the reason her loaves always looked bakery-perfect. That honey glaze seals in moisture and gives you that beautiful golden color everyone loves.
FAQ
Is honey good for bread?
Yes, honey is excellent for bread. It acts as a natural preservative, keeping your honey bread recipe moist for days. Honey also feeds the yeast, helping the dough rise better, and creates a tender crumb with a beautiful golden color.
Is honey bread a good sandwich bread?
Absolutely. The honey bread recipe creates a soft, sturdy slice that holds up to sandwich fillings without falling apart. The subtle sweetness pairs well with both savory ingredients like turkey and cheese or sweet options like peanut butter and jam.
Does honey make bread taste better?
Honey adds a delicate sweetness without being overwhelming. It enhances the bread's flavor while keeping the texture incredibly soft. The honey bread recipe tastes better than plain bread because honey adds complexity that white sugar can't match.
Can you use raw honey in bread?
Yes, raw honey works perfectly in this honey bread recipe. The baking temperature won't destroy the honey's beneficial properties, though it will eliminate some enzymes. Raw honey creates the same soft, sweet bread with slightly deeper flavor notes.
Your Next Baking Adventure Awaits
This honey bread recipe proves that homemade bread doesn't have to be intimidating. You've got everything you need to create bakery-quality loaves right in your own kitchen. The soft texture and gentle sweetness make it perfect for every meal of the day.
Once you've mastered this honey bread recipe, try branching out with other breakfast favorites. The Lemon Poppy Seed Pancakes Recipe brings bright citrus flavor to your morning routine, while the Chocolate Cherry Overnight Oats Recipe offers a no-cook option for busy days. All three recipes share that homemade goodness that makes breakfast special. Give this honey bread recipe a try this weekend; your kitchen will smell amazing, and your family will thank you.
Thanks for baking along with me – By Lisa Johnson 🌸
Related
Looking for other recipes like this? Try these:


Pairing
These are my favorite dishes to serve with Honey Bread Recipe


Honey Bread Recipe
Equipment
- 1 9x5 inch loaf pan Standard loaf pan size
- 1 Large mixing bowl Room for dough to rise
- 1 Wooden spoon For mixing dough
- 1 Pastry brush For brushing honey glaze
- 1 Wire cooling rack Prevents soggy bottom
- 1 Damp kitchen towel Keeps dough moist while rising
- 1 Kitchen thermometer For milk temp & doneness
- Optional Stand mixer with dough hook Optional, saves kneading effort
Ingredients
- 3 cups All-purpose flour Spoon and level, don’t scoop
- 1 packet (2¼ tsp) Active dry yeast Check freshness
- ¼ cup Honey Substitute with maple syrup if needed
- 1 cup Warm milk (110°F) Almond milk for dairy-free
- 3 tablespoon Melted butter Coconut oil works too
- 1 teaspoon Salt Enhances flavor
- 1 large Egg Adds structure
- 2 tablespoon Honey (optional) For brushing top
- Oats or seeds (optional) For texture and topping
Instructions
- Activate yeast with warm milk and honey until foamy.
- Mix dough with butter, egg, salt, and flour.
- Knead dough until smooth and tacky.
- Let dough rise until doubled, then punch down.
- Shape into loaf and do second rise in pan.
- Brush with honey and bake until golden.
- Cool loaf before slicing.
Notes
- Nutrition information is automatically calculated, so should only be used as an approximation.


Leave a Reply