
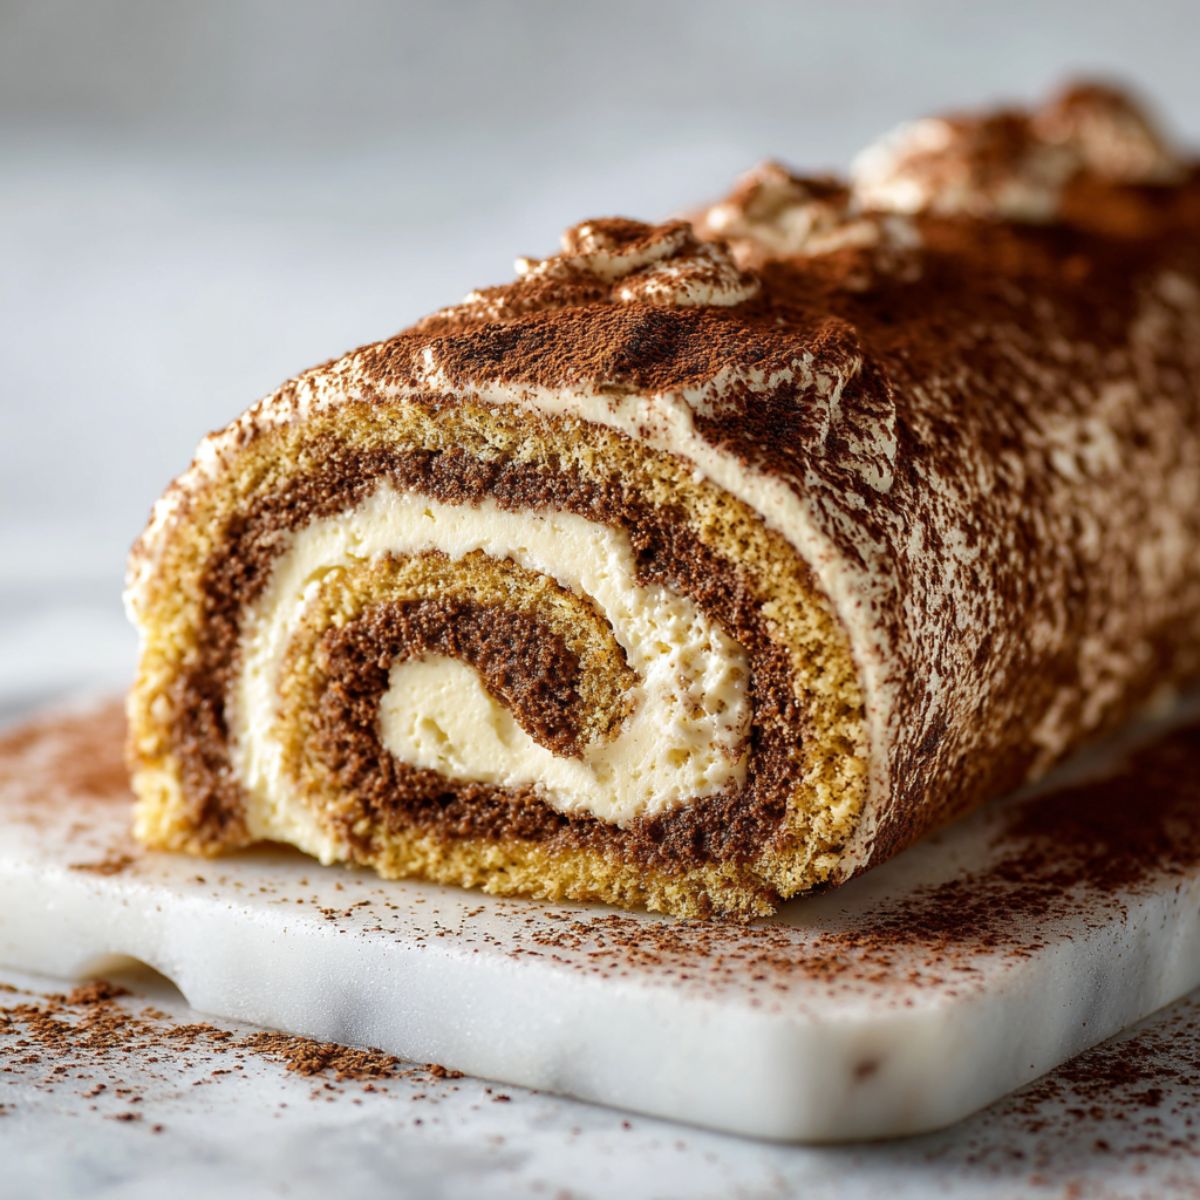
I still remember the first time I tried to make a Tiramisu Cake Roll Recipe in my tiny apartment kitchen. The sponge cracked, the filling oozed everywhere, and I almost gave up on Italian desserts forever. But here's the thing; once you nail the technique, this Tiramisu Cake Roll Recipe becomes your secret weapon for impressing guests without spending hours in the kitchen.
This Tiramisu Cake Roll Recipe combines everything we love about classic tiramisu with the elegant presentation of a Swiss roll. The coffee-soaked sponge stays incredibly moist, the mascarpone filling tastes like clouds, and that cocoa powder dusting? Pure Italian magic. Whether you're planning a holiday dinner or just craving something special on a Tuesday night, this Tiramisu Cake Roll Recipe delivers restaurant-quality results at home.
What Makes This Italian Dessert Roll Stand Out
Traditional tiramisu recipes can feel intimidating with all those ladyfingers and delicate layers. This Tiramisu Cake Roll Recipe simplifies the process while keeping all those beloved coffee and cream flavors we crave. The espresso-infused sponge cake provides a lighter base than heavy ladyfingers, and rolling everything together means every single bite gets the perfect ratio of cake to filling.
I've tested this Tiramisu Cake Roll Recipe dozens of times, tweaking the coffee concentration and adjusting the mascarpone mixture until it reached that sweet spot between stable and silky. The secret lies in whipping the cream just right and giving your sponge cake the attention it deserves. Unlike no-bake versions that can feel dense, this Tiramisu Cake Roll Recipe offers a fluffy texture that melts on your tongue while still delivering that signature coffee kick we all expect from authentic Italian tiramisu desserts.s are far more valuable than a group listed at the bottom of the post.
Jump to:
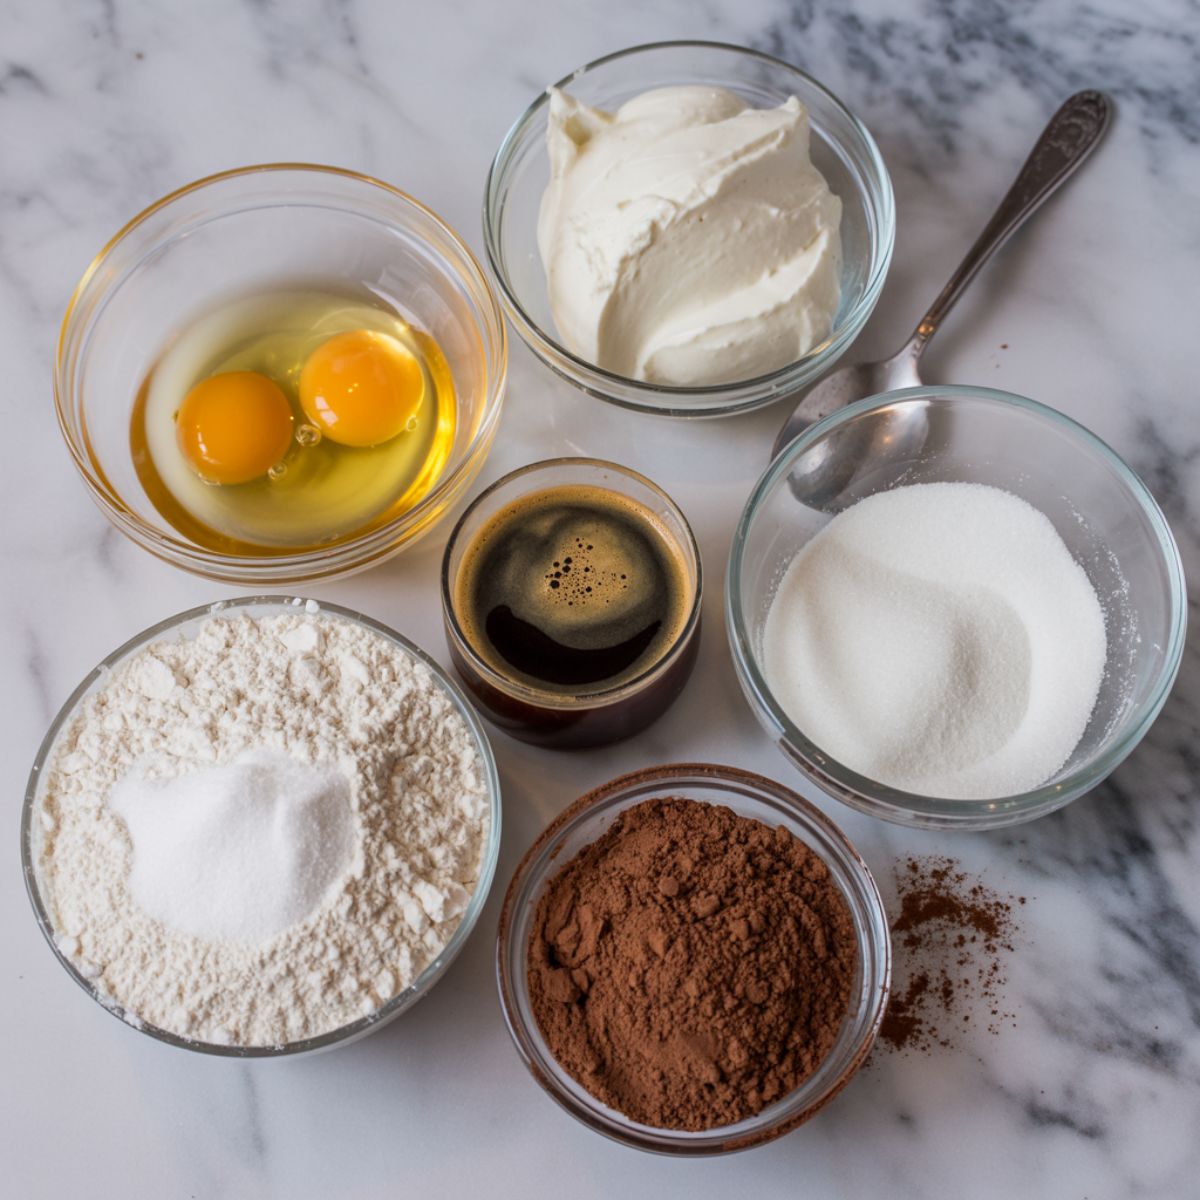
Ingredients
For the Espresso Sponge Cake
- Large eggs (room temperature) ; separated whites whip better and create that airy texture we need
- Granulated sugar ; divided into portions for the yolks and whites
- Strong brewed espresso (cooled) ; instant espresso powder works too, just dissolve in hot water
- Vanilla extract ; pure extract gives better flavor than imitation
- All-purpose flour ; cake flour makes it even lighter if you have it
- Baking powder ; helps the sponge rise properly
- Salt ; balances the sweetness
- Unsalted butter (melted and cooled) ; adds moisture and richness
- Powdered sugar (for rolling) ; prevents sticking when the cake is warm
For the Mascarpone Cream Filling
- Mascarpone cheese (softened) ; cream cheese works in a pinch but changes the authentic taste
- Heavy whipping cream (cold) ; the colder, the better for stable peaks
- Powdered sugar ; smoother than granulated in whipped cream
- Coffee liqueur (optional) ; Kahlua adds depth, or use extra espresso for alcohol-free
- Vanilla extract ; enhances all the flavors
- Strong brewed espresso (cooled) ; ties everything to the coffee theme
For Assembly and Decoration
- Extra powdered sugar ; for final dusting
- Cocoa powder ; Dutch-process gives the richest color
- Chocolate shavings (optional) ; use a vegetable peeler on a chocolate bar
See recipe card for quantities.
Instructions
Preparing the Coffee Sponge Base
- Preheat your oven to 350°F and line a 15x10-inch jelly roll pan with parchment paper, leaving some overhang on the sides for easy removal.
- Separate your eggs carefully, making sure no yolk gets into the whites (even a tiny bit stops them from whipping properly).
- Beat the egg yolks with ½ cup sugar using an electric mixer on high speed for about 3 minutes until they turn pale yellow and thick.
- Add the cooled espresso, vanilla extract, and melted butter to the yolk mixture, beating on low speed until just combined.
- In a separate bowl, sift together the flour, baking powder, and salt to remove any lumps.
- Gently fold the dry ingredients into the yolk mixture using a rubber spatula, being careful not to overmix.
- In another clean bowl with clean beaters, whip the egg whites on medium speed until foamy, then gradually add the remaining ¼ cup sugar.
- Continue beating on high speed until stiff peaks form (the whites should stand straight up when you lift the beaters).
- Fold one-third of the whipped whites into the batter to lighten it, then gently fold in the remaining whites until no streaks remain.
- Pour the batter into your prepared pan and spread it evenly into all corners using an offset spatula.
Baking and Rolling the Sponge
- Bake for 12-15 minutes until the cake springs back when lightly touched and the edges just start pulling away from the pan.
- While it bakes, lay out a clean kitchen towel and dust it generously with powdered sugar (trust me, don't skip this step).
- The moment the cake comes out of the oven, run a knife around the edges to loosen it.
- Flip the hot cake onto the sugar-dusted towel and carefully peel off the parchment paper.
- Starting from the short end, roll the cake up with the towel inside while it's still warm (this trains the cake to hold its shape).
- Let the rolled cake cool completely on a wire rack, seam side down, for about 30 minutes.
Creating the Creamy Mascarpone Filling
- In a large bowl, beat the softened mascarpone cheese with an electric mixer on medium speed for about 1 minute until smooth and creamy.
- Add the powdered sugar and vanilla extract, beating until fully incorporated.
- Pour in the cold heavy cream and start mixing on low speed to avoid splatters.
- Gradually increase to high speed and whip until stiff peaks form (this takes about 3-4 minutes).
- Add the cooled espresso and coffee liqueur if using, then beat for another 30 seconds to blend.
- Taste the filling and adjust sweetness if needed (remember, the cake itself isn't very sweet, so the filling should be flavorful).
Assembly and Final Touches
- Dust generously with cocoa powder using a fine-mesh sieve, then add chocolate shavings and a final dusting of powdered sugar if desired.
- Carefully unroll the cooled cake (it might crack slightly on top, which is totally normal and gets covered anyway).
- Brush the inside of the cake with ¼ cup of espresso using a pastry brush for extra moisture and coffee flavor.
- Spread the mascarpone filling evenly over the cake, leaving about a 1-inch border on all sides.
- Starting from the same short end, roll the cake back up without the towel this time, keeping it tight but not squeezing out the filling.
- Wrap the entire roll in plastic wrap and refrigerate for at least 2 hours (overnight is even better for the flavors to meld).
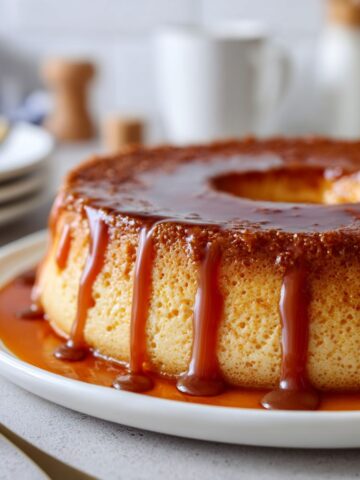
- Before serving, unwrap the cake and place it seam side down on your serving platter.
Expert Cooking Tips
Getting Your Egg Whites Perfect
- The key to a fluffy espresso sponge roll lies in properly whipped egg whites. Make sure your bowl and beaters are completely clean and dry because even a tiny bit of grease prevents the whites from reaching stiff peaks. Room temperature eggs separate more easily, but cold whites actually whip up higher. I like to separate them cold, then let the whites sit for 15 minutes before whipping. When you reach stiff peaks, the mixture should look glossy and hold its shape when you turn the bowl upside down (do this test carefully over the sink the first few times).
The Rolling Technique That Saves Your Cake
- Rolling a warm cake sounds scary, but it's actually the secret to preventing cracks in your finished Tiramisu Cake Roll Recipe. The heat makes the sponge flexible and pliable. If you wait until it cools completely before the first roll, you'll end up with a cracked mess. That first roll with the towel creates a muscle memory in the cake, so when you unroll it later to add filling, it naturally wants to curl back into that shape. Some small cracks on the surface are completely normal and get hidden under cocoa powder, so don't stress about perfection.
Mascarpone Filling Consistency Matters
- Bring your mascarpone to room temperature before beating it; cold mascarpone can be lumpy
- Whip the cream to stiff peaks, not soft peaks, or it'll ooze out when you slice the roll
- If your filling seems too soft, pop it in the fridge for 15 minutes to firm up before spreading
- Don't overbeat after adding the espresso or you risk turning it grainy
Coffee Flavor Adjustments
- Some people love an intense coffee punch while others prefer a milder taste. For a stronger coffee flavor, use 3 tablespoons of instant espresso powder instead of 2, or brush the cake with an extra espresso soak before adding the filling. If you're serving this to kids or coffee-sensitive folks, reduce the espresso to 2 tablespoons in the cake and skip the coffee liqueur in the filling.
Timing Your Baking Day
- This dessert actually tastes better when made ahead. The flavors develop and deepen after sitting in the fridge overnight, and the sponge softens to that perfect tiramisu texture. I usually bake and roll it on a Friday evening, then finish the assembly Saturday morning for a dinner party that night. The filling can be made a few hours ahead and kept chilled, which actually makes it easier to spread.
Recipe Variations & Substitutions
Dietary Modifications for Different Needs
- Gluten-Free Version: Replace the all-purpose flour with a 1:1 gluten-free baking flour blend. Make sure it includes xanthan gum for structure. The texture might be slightly denser but still delicious.
- Lower Sugar Option: Cut the sugar in the sponge to ½ cup total and use only ⅓ cup powdered sugar in the filling. The result is less sweet but lets the coffee flavor shine through more prominently.
- Dairy-Free Adaptation: This one's trickier since mascarpone is the star, but you can substitute with cashew cream cheese and coconut whipping cream. Soak 1 cup raw cashews overnight, blend with 2 tablespoons lemon juice and ¼ cup water until super smooth, then fold in whipped coconut cream.
- Alcohol-Free Version: Simply replace the coffee liqueur with an equal amount of strong espresso or add ½ teaspoon of rum extract for that depth of flavor without the alcohol content.
Creative Flavor Twists
- Chocolate Lovers: Add 3 tablespoons cocoa powder to the sponge cake batter and reduce flour by 3 tablespoons for a chocolate tiramisu roll
- Hazelnut Dream: Fold ½ cup finely ground toasted hazelnuts into the mascarpone filling and garnish with whole hazelnuts
- Orange Twist: Add 1 tablespoon orange zest to the filling and brush the cake with a mixture of espresso and orange liqueur
- Amaretto Style: Replace coffee liqueur with amaretto and add ¼ teaspoon almond extract to the filling
Texture and Presentation Variations
- For a denser, more traditional texture similar to classic tiramisu, you can brush the finished cake with extra espresso syrup before refrigerating. Some people prefer adding a layer of chocolate ganache under the mascarpone filling for richness. If you want individual servings, slice the roll and stand each piece on end in cupcake liners, then dust with cocoa powder for elegant presentation at parties.
Equipment Recommendations
- 15x10-inch Jelly Roll Pan ; the specific size matters for proper thickness, too thick and it won't roll, too thin and it tears
- Parchment Paper ; silicone mats don't work as well because you need to peel the paper off after baking
- Electric Hand Mixer or Stand Mixer ; whipping egg whites and cream by hand is possible but exhausting
- Rubber Spatula ; essential for folding without deflating your carefully whipped ingredients
- Fine-Mesh Sieve ; creates that professional-looking dusting of cocoa powder
- Clean Kitchen Towel ; not terry cloth (the cake sticks to it), a smooth flour sack towel works perfectly
- Offset Spatula ; makes spreading the filling evenly so much easier
- Pastry Brush ; for brushing the espresso soak onto the cake
Most of these tools you probably already have in your kitchen. If you're missing the jelly roll pan, a half-sheet pan works but watch the baking time since it'll be thinner. For the mixer, a stand mixer frees up your hands but isn't necessary for this Tiramisu Cake Roll Recipe.
Storage & Meal Prep Tips
Refrigerator Storage
- Keep your assembled Tiramisu Cake Roll Recipe wrapped tightly in plastic wrap in the refrigerator for up to 4 days. The cream filling stays fresh and the coffee flavors actually deepen over time. Always store it with the seam side down to maintain the shape. Before serving leftover slices, let them sit at room temperature for about 10 minutes to take the chill off.
Freezing Instructions
- This dessert freezes surprisingly well for up to 2 months. Wrap the finished roll (without the cocoa powder dusting) in two layers of plastic wrap, then a layer of aluminum foil. Thaw it overnight in the refrigerator, still wrapped, to prevent condensation. Add the cocoa powder dusting right before serving for the freshest look.
Make-Ahead Strategy
- 2 Days Before: Bake the sponge cake, roll it with the towel, and store wrapped at room temperature
- 1 Day Before: Make the mascarpone filling and assemble the complete roll, refrigerate overnight
- Day Of: Dust with cocoa powder and add garnishes just before serving
Slice and Serve Tips
- Use a sharp, thin knife wiped clean between each cut for neat slices. A serrated bread knife actually works better than a smooth blade because it saws through without smashing the delicate sponge. Dip the knife in hot water, wipe it dry, then make your cut for the cleanest edges that show off all those beautiful swirls.
Grandma's Secret That Changed Everything
My Italian grandmother once told me that the difference between good tiramisu and unforgettable tiramisu comes down to patience. She never rushed the soaking step or skimped on the resting time. For this Tiramisu Cake Roll Recipe, that wisdom translates into letting your assembled roll rest in the fridge for at least 4 hours, though overnight is better.
During this time, the espresso-soaked sponge absorbs the coffee flavors completely, the mascarpone filling firms up to the perfect sliceable consistency, and all those distinct layers start to meld into something magical. I've seen people cut into their roll after just an hour, and while it tastes fine, it doesn't have that cohesive texture that makes this Tiramisu Cake Roll Recipe truly special. The second secret? Always serve it cold, straight from the fridge, because that cool temperature makes the cream filling taste incredibly luxurious and keeps everything structurally sound.
FAQ
What is so special about tiramisu cake?
Tiramisu combines coffee-soaked cake with rich mascarpone cream and cocoa powder in a way that creates a unique balance of flavors and textures. The espresso provides a sophisticated bitterness that cuts through the sweet cream, while the soft, almost pudding-like consistency feels indulgent without being heavy. This Tiramisu Cake Roll Recipe captures all those elements in a more manageable format that's perfect for slicing and serving at gatherings.
What's the secret to a perfectly rolled Swiss roll?
The secret lies in rolling the cake while it's still warm from the oven, using the towel technique to train it into shape. A warm sponge is flexible and forgiving, while a cold cake will crack immediately. Always dust your towel with powdered sugar to prevent sticking, roll from the short end for tighter spirals, and don't squeeze too hard. When you unroll it later to add filling, those "memory creases" help it roll back up perfectly without breaking.
Does Trader Joe's have tiramisu cake?
Trader Joe's occasionally carries seasonal tiramisu products, including a tiramisu cake during holiday periods, though availability varies by location and time of year. Their offerings change frequently, so it's best to check with your local store or their website. However, making this Tiramisu Cake Roll Recipe at home gives you complete control over the coffee intensity and cream sweetness, plus it's often fresher than store-bought versions.
Does Costco sell a tiramisu cake?
Yes, Costco regularly stocks tiramisu cakes in their bakery section, typically in large sizes perfect for parties and gatherings. Their version usually comes in a rectangular container and serves 12-16 people. While convenient for large events, this homemade Tiramisu Cake Roll Recipe offers a more elegant presentation and allows you to customize the flavors to your preferences, making it ideal for special occasions when you want to impress.
Wrap Up Your Italian Dessert Journey
This Tiramisu Cake Roll Recipe proves that restaurant-quality Italian desserts belong in home kitchens too. The combination of espresso-soaked sponge and fluffy mascarpone cream never fails to impress, whether you're serving it at a holiday party or enjoying a quiet slice with your afternoon coffee. Once you master the rolling technique, you'll find yourself making this Tiramisu Cake Roll Recipe again and again because it feels fancy but comes together in about an hour of active work.
If you loved the coffee flavors in this recipe, try my Hot Cocoa Poke Cake Recipe for a chocolate twist on moist, flavorful cakes, or explore my Raspberry Cake Roll Recipe for a fruity take on the Swiss roll technique. Both use similar rolling methods but showcase completely different flavor profiles that your family will love just as much as this Tiramisu Cake Roll Recipe.
With love-Lisa Johnson💕
Related
Looking for other recipes like this? Try these:


Pairing
These are my favorite dishes to serve with Tiramisu Cake Roll Recipe


Tiramisu Cake Roll Recipe
Equipment
- 1 15x10-inch Jelly Roll Pan For ideal cake thickness
- 1 Parchment paper Prevents sticking
- 1 Electric hand mixer or stand mixer For beating eggs and cream
- 1 Rubber spatula For gentle folding
- 1 Fine-mesh sieve For dusting cocoa powder
- 1 Clean kitchen towel Use a smooth, non-terry towel
- 1 Offset spatula For spreading filling evenly
- 1 Pastry brush For brushing espresso onto cake
Ingredients
Espresso Sponge Cake
- 4 large Eggs Separated
- ¾ cup Granulated sugar Divided for yolks and whites
- ¼ cup Strong brewed espresso Cooled
- 1 teaspoon Vanilla extract Use pure extract
- 1 cup All-purpose flour Sifted
- 1 teaspoon Baking powder Helps sponge rise
- ¼ teaspoon Salt Balances sweetness
- 2 tablespoon Unsalted butter Melted and cooled
- Powdered sugar For rolling to prevent sticking
Mascarpone Cream Filling
- 8 oz Mascarpone cheese Softened
- 1 ½ cups Heavy whipping cream Cold for stiff peaks
- ½ cup Powdered sugar Adds smooth sweetness
- 2 tablespoon Coffee liqueur Optional (or use espresso)
- 1 teaspoon Vanilla extract Enhances flavor
- ¼ cup Strong brewed espresso Cooled
Assembly and Decoration
- 2 tablespoon Cocoa powder For dusting top
- Chocolate shavings Optional garnish
- Powdered sugar For final dusting
Instructions
- Preheat oven to 350°F and line a jelly roll pan with parchment paper.
- Beat egg yolks with sugar until thick and pale. Add espresso, vanilla, and melted butter.
- Sift flour, baking powder, and salt. Fold gently into yolk mixture.
- Whip egg whites until stiff peaks form, then fold into batter.
- Spread batter evenly in pan and bake 12–15 minutes until springy.
- Turn cake onto a powdered-sugar-dusted towel, peel off parchment, and roll with towel inside. Cool.
- Beat mascarpone, powdered sugar, and vanilla until smooth. Add cream and whip to stiff peaks. Mix in espresso and liqueur.
- Unroll cake, brush with espresso, and spread filling evenly. Re-roll without towel.
- Wrap and chill for at least 2 hours or overnight.
- Dust with cocoa powder and chocolate shavings before serving.
Notes
- Nutrition information is automatically calculated, so should only be used as an approximation.

Leave a Reply