
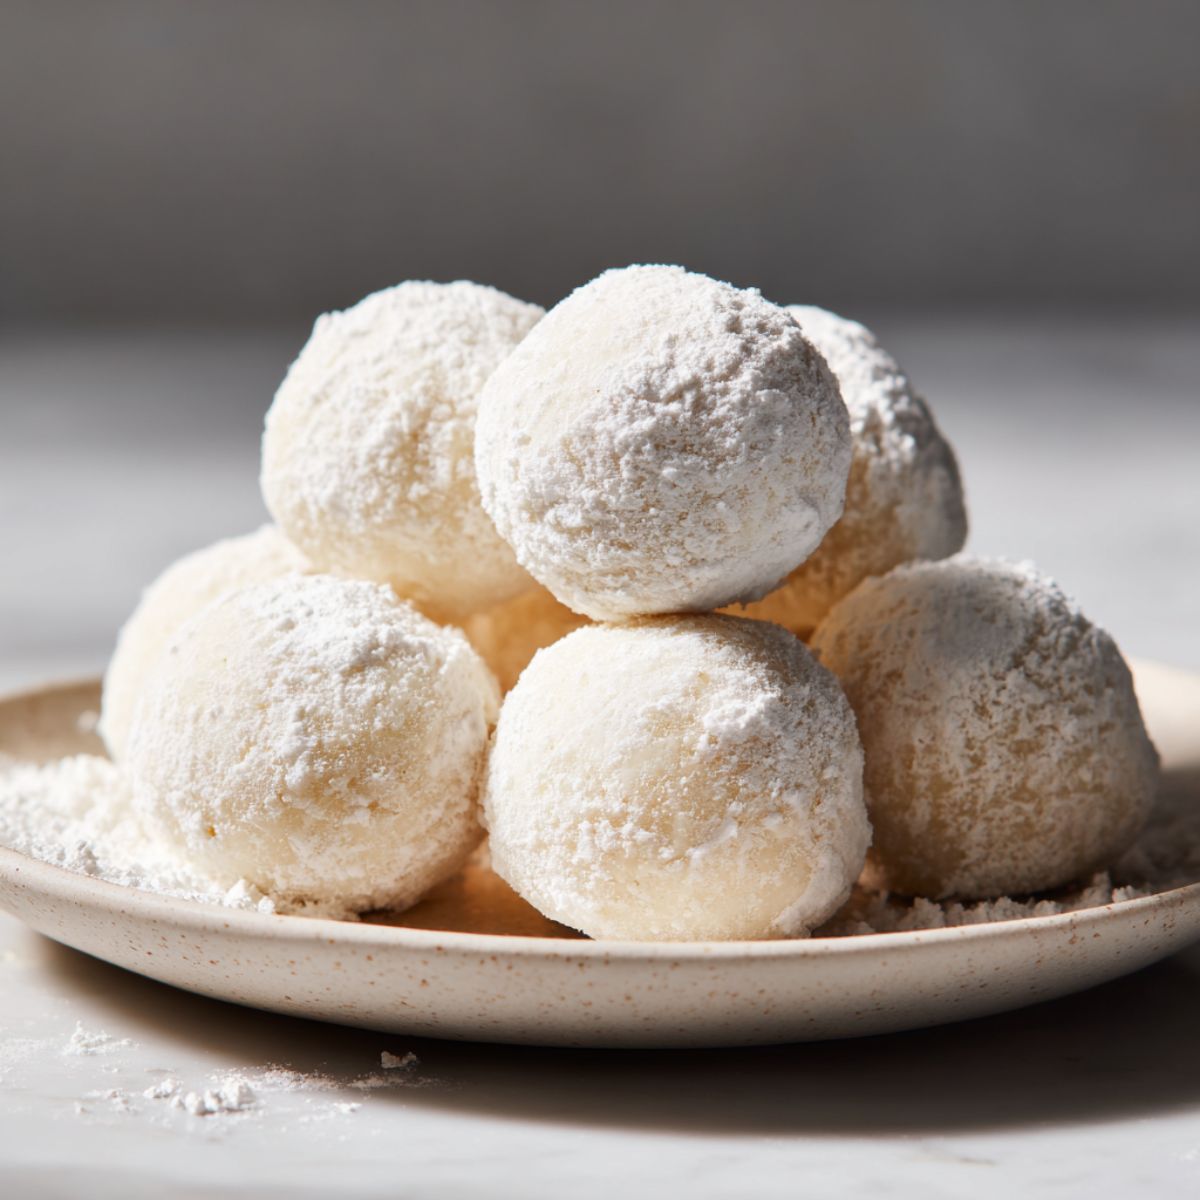
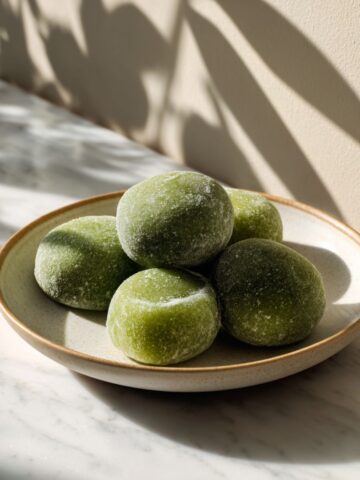
Have you ever bitten into a cloud? That's what eating homemade milk mochi feels like. This milk mochi recipe brings the magic of Japanese confectionery right into your kitchen, and trust me, once you make these pillowy soft treats, store-bought versions won't cut it anymore. I've been making this milk mochi recipe for years, and it never fails to impress friends and family at gatherings.
What makes this milk mochi recipe so special is its simplicity. With just a handful of ingredients and about 30 minutes, you'll have a batch of chewy, creamy mochi balls that melt in your mouth. Whether you're craving a sweet milk dessert idea or want to explore Asian milk mochi snacks, this milk mochi recipe delivers authentic taste without the fuss.
Why This Sweet Milk Mochi Deserves a Spot in Your Recipe Collection
This milk mochi recipe stands out because it strikes the perfect balance between traditional technique and modern convenience. Unlike many complicated Japanese desserts, this soft milk mochi doesn't require specialty equipment or hard-to-find ingredients. You probably have everything you need sitting in your pantry right now. The beauty of this milk mochi recipe lies in its versatility; it works as an afternoon snack, a party dessert, or even a midnight treat when those sweet cravings hit.
The creamy mochi treat you'll create with this milk mochi recipe has roots in traditional Japanese sweets, but it's been adapted to suit contemporary tastes. The addition of fresh milk gives these mochi balls an incredibly smooth texture that's different from classic versions. This milk mochi recipe pairs wonderfully with green tea, coffee, or even as a topping for shaved ice desserts. Once you master this basic milk mochi recipe, you'll find yourself making it weekly.
Jump to:
Ingredients
- Salt
- Glutinous rice flour (sweet rice flour)
- Whole milk
- Granulated sugar
- Cornstarch
- Water
- Potato starch or cornstarch (for coating)
- Sweetened condensed milk (optional)
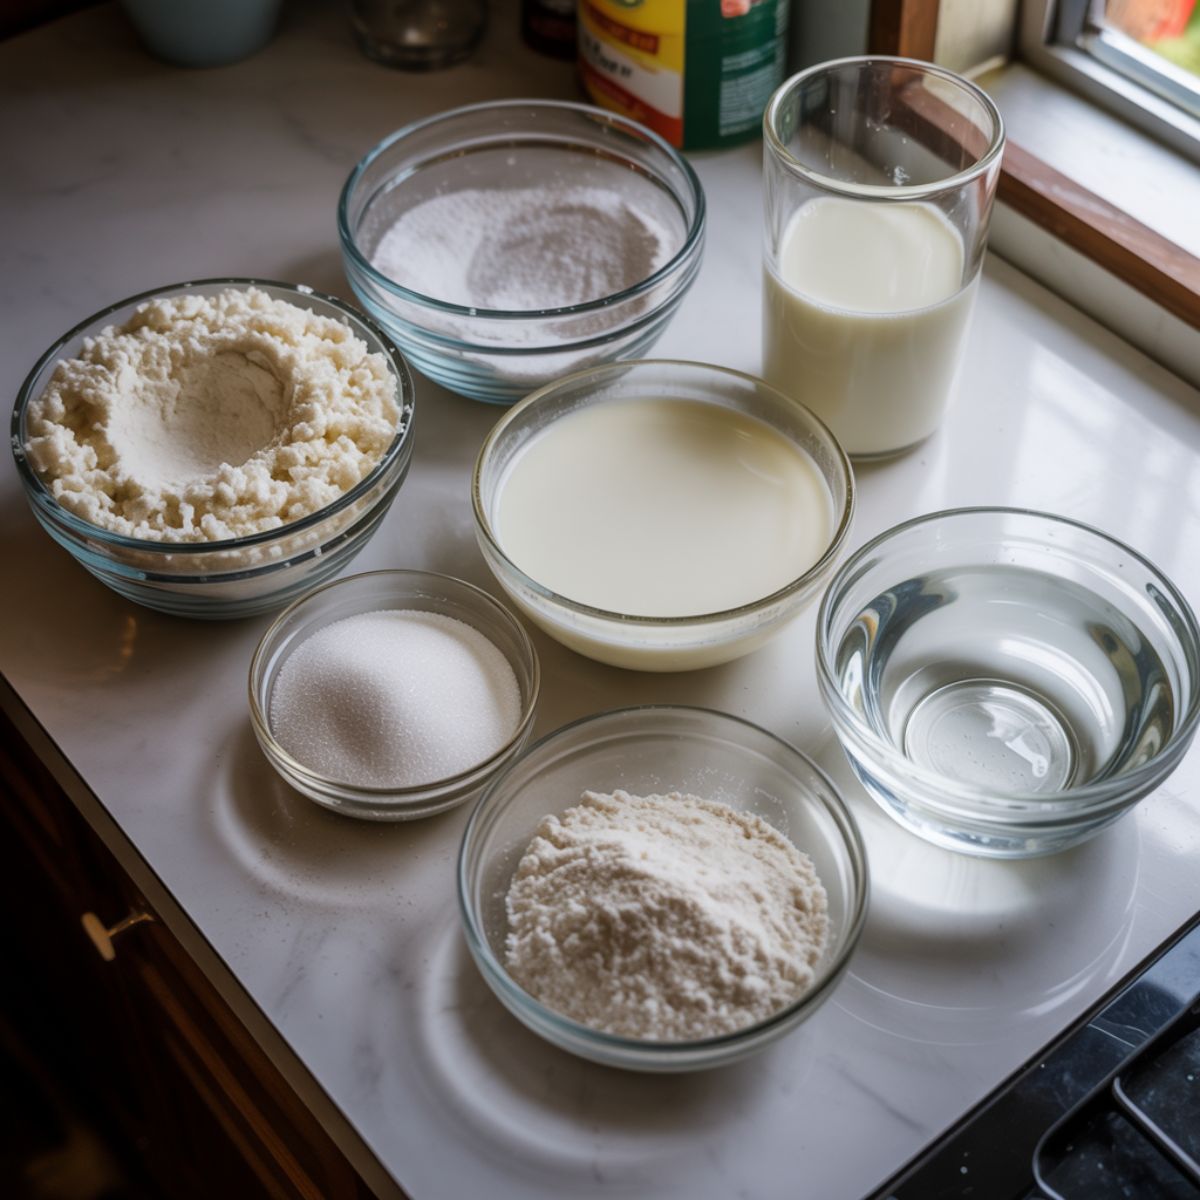
See recipe card for quantities.
Instructions
Preparing Your Mochi Mixture
- Grab a medium-sized microwave-safe bowl and combine the glutinous rice flour, sugar, cornstarch, and salt.
- Pour in the milk and water gradually while whisking to prevent lumps from forming.
- Mix until you have a smooth, lump-free batter that resembles thick pancake batter.
- The mixture should be pourable but not too watery at this stage.
Pro Tip: Room temperature milk blends more easily than cold milk, giving you a smoother batter for your homemade milk mochi.
Cooking the Mochi Dough
- Cover your bowl loosely with plastic wrap, leaving a small vent for steam to escape.
- Microwave on high for 1 minute, then remove and stir thoroughly with a wet spatula.
- Return to the microwave for another 1-minute interval, stir again vigorously.
- Continue this process for one more minute until the mixture becomes translucent and stretchy.
- The total cooking time should be about 3 minutes, but microwaves vary, so watch carefully.
Important Note: The dough will be extremely hot and sticky. Let it cool for 2-3 minutes before handling this easy mochi recipe.
Shaping Your Soft Mochi Balls
- Generously dust your work surface with potato starch or cornstarch.
- Turn out the hot mochi dough onto the starch-covered surface using a wet spatula.
- Dust the top of the dough with more starch to prevent sticking to your hands.
- Once cool enough to handle, divide the dough into 8-10 equal portions using a bench scraper.
- Roll each portion into a smooth ball between your palms, adding more starch as needed.
- Place finished mochi balls on a starch-dusted plate, ensuring they don't touch each other.
Final Touches for Perfect Chewy Milk Mochi
- Your milk mochi recipe is now complete and ready to enjoy!
- Allow the mochi balls to cool completely at room temperature for about 15 minutes.
- Gently brush off excess starch with a pastry brush or your fingers.
- For an extra indulgent touch, drizzle with condensed milk or dust with powdered sugar.
Expert Cooking Tips
- Temperature Control Matters Watch your microwave carefully during cooking. Overheating creates tough, rubbery mochi instead of the soft, chewy texture we want. If you notice the edges getting too firm, reduce cooking time by 15-second intervals.
- The Starch Technique Don't skimp on the starch coating. It's the secret to handling this sticky dough without frustration. Keep a small bowl of starch nearby and dust your hands frequently while shaping.
- Texture Testing The perfectly cooked mochi should be translucent and pull away from the bowl sides easily. If it's still cloudy white, it needs more cooking time. The dough should be stretchy but not liquid.
- Working Speed Mochi dough becomes harder to work with as it cools. Shape your mochi balls while the dough is still warm but not burning hot. If it gets too stiff, microwave for 10-15 seconds to soften.
- Prevent Cracking Roll your mochi balls gently but firmly. Too much pressure creates cracks, while too little leaves them misshapen. The goal is smooth, seamless spheres that showcase that beautiful chewy texture.
- Flavor Boost Add a drop of vanilla extract to your batter for subtle depth, or try a pinch of matcha powder for a matcha milk mochi variation. These small additions transform the basic recipe into something extraordinary.
Recipe Variations & Substitutions
Dairy-Free Options
- Coconut milk mochi is my go-to dairy-free version. Use full-fat canned coconut milk for the creamiest results. The coconut flavor adds a tropical twist that's absolutely delicious. You can also try oat milk or cashew milk, though they produce a slightly less rich texture than traditional milk.
Flavor Variations
- Transform this basic milk mochi recipe into different treats throughout the year. Add 1 tablespoon cocoa powder for chocolate milk mochi, or fold in fresh strawberry puree for a fruity version. During holidays, I make vanilla milk mochi by doubling the vanilla extract and adding a touch of almond extract.
Sweetness Adjustments
- Cut the sugar to 2 tablespoons if you prefer less sweet desserts. For an ultra-indulgent version, increase to ⅓ cup and add 1 tablespoon of condensed milk directly into the batter. This creates an incredibly creamy mochi with milk that's perfect for special occasions.
Filled Mochi
- Level up your skills by adding fillings. Flatten each dough portion, place a small cube of cream cheese or a dollop of red bean paste in the center, then seal and roll into a ball. This technique requires practice but creates restaurant-quality results.
Texture Modifications
- For a softer milk mochi, reduce cornstarch to 1 tablespoon. If you prefer extra chewiness, replace 2 tablespoons of rice flour with tapioca starch. Each adjustment changes the final texture, so experiment to find your perfect balance.
Equipment Recommendations
- Microwave-safe mixing bowl; glass or ceramic works best for even heating in this easy mochi recipe
- Whisk or fork; essential for creating a lump-free batter
- Rubber spatula; wet it before use to prevent sticking
- Plastic wrap or microwave cover; allows steam to cook the dough properly
- Bench scraper or sharp knife; makes dividing the dough cleaner and easier
- Pastry brush; helps remove excess starch for a polished finish
- Digital kitchen scale (optional); ensures perfectly sized portions every time
Budget-friendly alternatives work just fine. A regular fork can replace a whisk, and plastic sandwich bags can substitute for professional pastry tools. The key is having heat-safe bowls and a reliable microwave.
Storage & Meal Prep Tips
Room Temperature Storage
- Freshly made mochi stays soft at room temperature for 6-8 hours. Keep them in an airtight container with parchment paper between layers to prevent sticking. This works great if you're serving them the same day.
Refrigerator Storage
- Store your milk mochi recipe results in the fridge for up to 3 days. Place them in an airtight container with cornstarch-dusted parchment paper separating layers. Before eating, let them sit at room temperature for 10-15 minutes; cold mochi becomes firm and less enjoyable.
Freezing Instructions
- Freeze individual mochi balls on a baking sheet for 2 hours, then transfer to a freezer bag. They'll keep for up to 1 month. Thaw at room temperature for 30 minutes before serving. Frozen mochi develops a slightly different texture but remains delicious.
Meal Prep Strategy
- Make a double batch and freeze half. This sweet milk dessert is perfect for last-minute entertaining or satisfying sudden dessert cravings without the full preparation time.
The Secret That Changed Everything
Here's what nobody tells you about making perfect mochi; the resting period makes all the difference. After cooking your milk mochi recipe, let the dough rest for exactly 3 minutes before handling. This brief wait allows the starches to set properly, creating that ideal soft and chewy texture that makes homemade milk mochi superior to store-bought versions.
Another game-changing trick I discovered by accident involves the condensed milk. Instead of just drizzling it on top, brush a thin layer onto each mochi ball before the final starch dusting. This creates a subtle sweetness that penetrates the exterior while keeping the signature texture intact. This simple step elevates your milk mochi recipe from good to absolutely unforgettable.
FAQ
What is milk mochi made of?
Milk mochi is made from glutinous rice flour, milk, sugar, and cornstarch. These simple ingredients combine to create the signature chewy, soft texture. The milk adds creaminess that distinguishes this milk mochi recipe from traditional water-based versions.
Is mochi healthy or unhealthy?
Mochi is relatively high in carbohydrates and sugar but contains no fat when made traditionally. This milk mochi recipe is a moderate treat; enjoy it occasionally as part of a balanced diet rather than daily consumption.
How many calories are in Taiwan milk mochi?
A single piece of homemade milk mochi contains approximately 60-80 calories, depending on size and added sweeteners. Taiwan-style commercial versions may have more calories due to fillings and additional sugar in this milk mochi recipe.
What is boba milk mochi?
Boba milk mochi combines chewy mochi with boba pearls, creating a dessert with multiple textures. Some versions wrap mochi around sweetened boba pearls, while others serve them alongside. It's a fusion treat popular in Asian dessert shops.
Sweet Endings Worth Sharing
Making this milk mochi recipe at home connects you to centuries of Japanese confectionery tradition while creating something uniquely yours. The satisfaction of biting into a perfectly chewy, homemade mochi ball never gets old, no matter how many times you make this milk mochi recipe. These little treats prove that impressive desserts don't need complicated techniques or expensive ingredients.
Now that you've mastered this milk mochi recipe, explore other delicious Asian-inspired desserts like our refreshing Orange Flan Recipe or the elegant Matcha Cake Roll Recipe. Both pair beautifully with mochi and expand your dessert repertoire. Share your milk mochi recipe results in the comments below, and don't forget to rate this recipe if you loved it as much as we do!
With love and sweet bites
By Lisa Johnson💛
Related
Looking for other recipes like this? Try these:
Pairing
These are my favorite dishes to serve with Milk Mochi Recipe


Milk Mochi Recipe
Equipment
- 1 Microwave-safe mixing bowl
- 1 Whisk or fork
- 1 Rubber spatula
- 1 Plastic wrap or microwave cover
- 1 Bench scraper or sharp knife
- 1 Pastry brush
- 1 Digital kitchen scale (optional)
Ingredients
Main Dough
- 1 cup Glutinous rice flour Also called sweet rice flour; gives chewy texture
- 0.5 cup Whole milk For creamy flavor
- 0.25 cup Granulated sugar Adjust for sweetness
- 2 tablespoon Cornstarch Helps soften texture
- 0.25 cup Water Adjust batter consistency
- 1 pinch Salt Enhances flavor
For Coating & Optional Garnish
- 0.5 cup Potato starch or cornstarch For coating and dusting
- 2 tablespoon Sweetened condensed milk Optional; for extra richness
Instructions
- In a microwave-safe bowl, combine glutinous rice flour, sugar, cornstarch, and salt. Gradually add milk and water, whisking until smooth.
- Cover the bowl with plastic wrap (vented) and microwave for 1 minute. Stir well, then microwave two more 1-minute intervals, stirring between each.
- When the mixture becomes translucent and stretchy, let it cool for 2–3 minutes.
- Dust a work surface with potato starch. Transfer the dough and dust the top with starch to prevent sticking.
- Divide the dough into 8–10 pieces and roll into smooth balls with your hands.
- Allow the mochi balls to cool for 15 minutes. Brush off excess starch.
- Drizzle with condensed milk or dust with powdered sugar before serving.
Notes
- Nutrition information is automatically calculated, so should only be used as an approximation.

Leave a Reply