
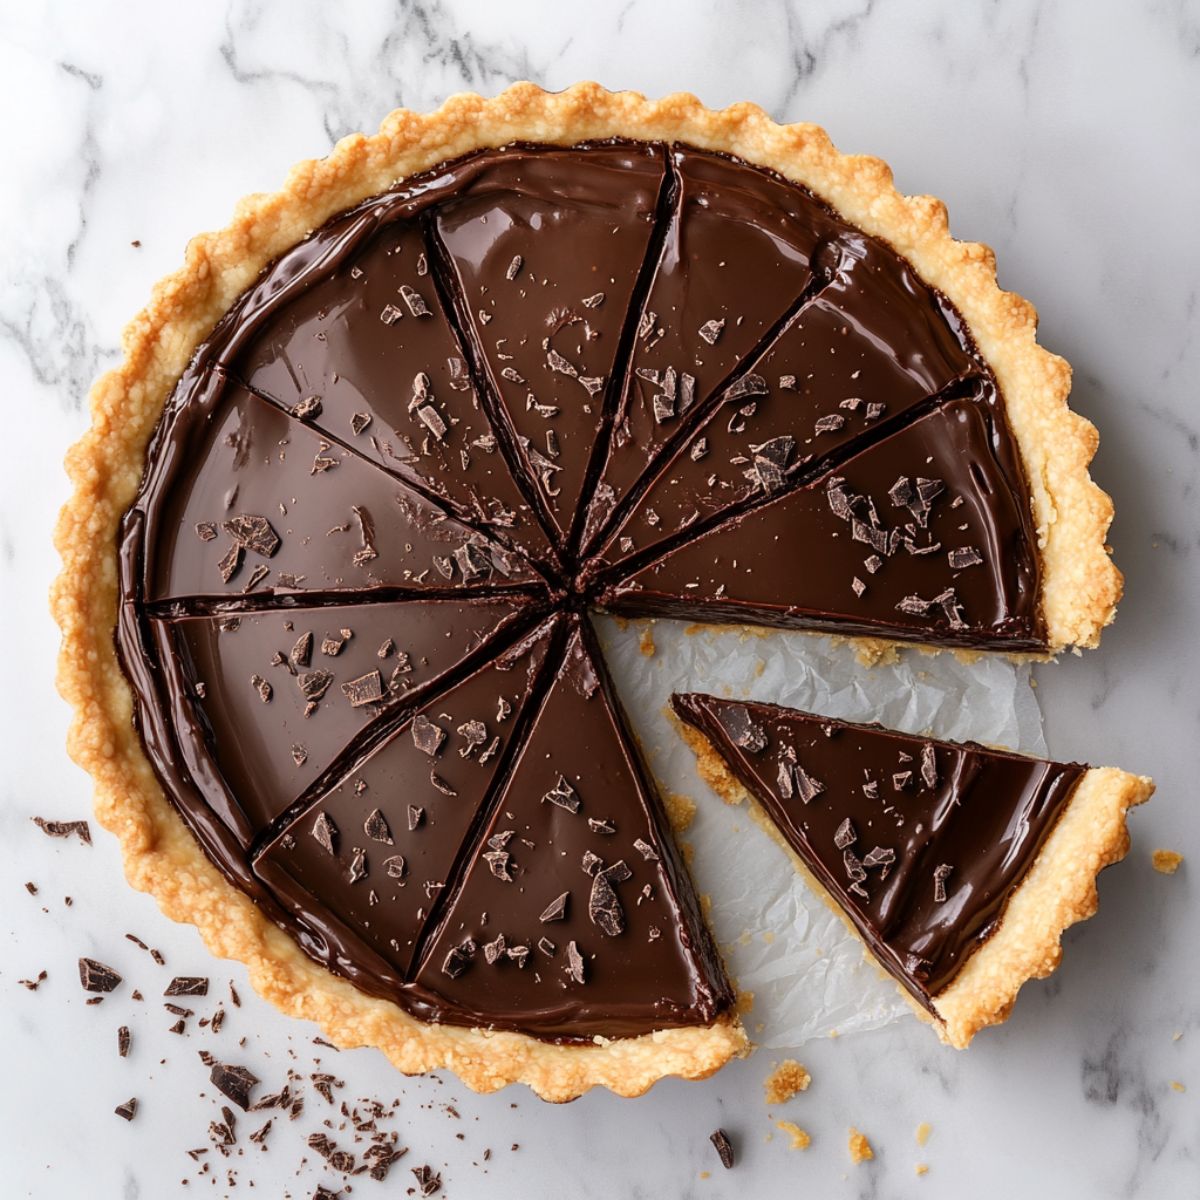
There’s something truly magical about a dessert that looks stunning and delivers on flavor; that’s exactly what this Chocolate Tart Recipe does. It gives you that moment of pure satisfaction when you slice through a glossy, silky chocolate layer and reveal the buttery shortcrust underneath—it feels like something out of a French patisserie.
What makes this Chocolate Tart Recipe stand out? It’s simple, approachable, and doesn’t require pastry school skills. Just five everyday ingredients and around 30 minutes of hands-on time are all it takes to create something elegant enough for a dinner party or romantic enough for Valentine’s Day.
I love how foolproof this Chocolate Tart Recipe is; no fancy equipment or complicated techniques—just a smooth ganache filling that melts in your mouth and a crisp, golden base that holds together beautifully.
Why You Will Love This Chocolate Tart Recipe
This Chocolate Tart Recipe has quickly become a go-to favorite for home bakers; it’s elegant, easy, and totally stress-free. Unlike other desserts that demand fancy tools or expert skills, this Chocolate Tart Recipe keeps it simple—with techniques anyone can master on the first try.
What really sets this Chocolate Tart Recipe apart is how customizable it is. Add fresh berries to turn it into a raspberry chocolate tart; drizzle on some caramel for a salted caramel twist; or swap the crust for hazelnut to make it extra rich.
It’s also a great make-ahead treat; in fact, this Chocolate Tart Recipe gets even better after a night in the fridge. Serve it with whipped cream or vanilla ice cream, and you’ve got a showstopper dessert without the stress.
Jump to:
Ingredients
For the Tart Crust:
- All-purpose flour – Creates the structure of your buttery shortcrust base
- Unsalted butter, cold and cubed – Keep it cold for the flakiest texture
- Powdered sugar – Adds sweetness without grittiness
- Large egg yolk – Binds everything together and adds richness
- Ice water – Use just enough to bring the dough together
Substitution tip: For an almond crust tart, replace some flour with almond flour for a nutty twist
For the Chocolate Ganache Filling:
- Dark chocolate, chopped – Use 60-70% cocoa for the perfect balance (milk chocolate tart lovers can use milk chocolate instead)
- Heavy cream – Creates that silky, smooth texture
- Unsalted butter – Adds extra richness and shine
- Vanilla extract – Enhances the chocolate flavor
- Sea salt – Brings out the chocolate's depth
For a white chocolate tart variation, simply swap the dark chocolate for high-quality white chocolate

See recipe card for quantities.
Instructions
Preparing the Tart Crust
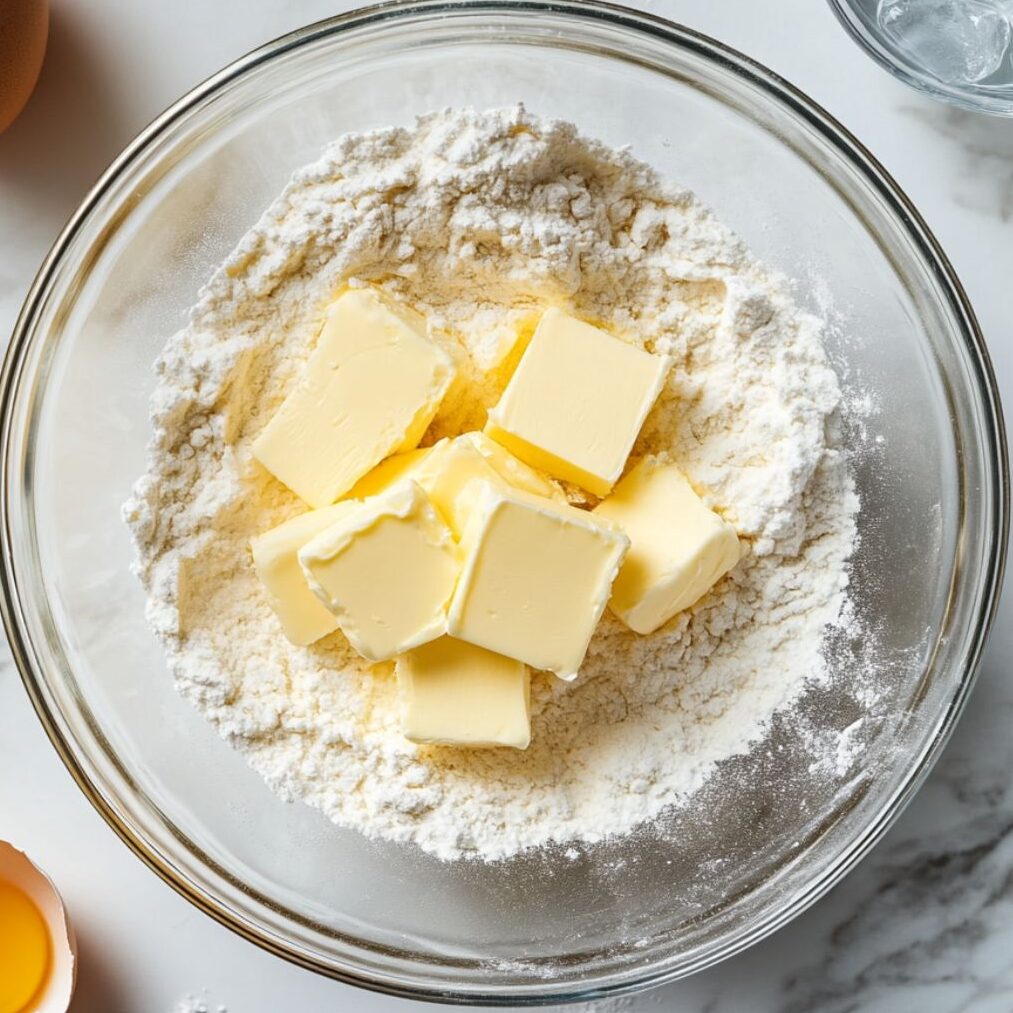
- Start by making your no-fail tart crust. In a large bowl, whisk together flour and powdered sugar. Add the cold, cubed butter and use your fingers or a pastry cutter to work it into the flour until the mixture looks like coarse breadcrumbs with some pea-sized butter pieces.
- Create a well in the center and add the egg yolk. Using a fork, gradually incorporate the flour mixture into the egg. Add ice water one tablespoon at a time until the dough just comes together – don't overwork it or your crust will be tough.
Pro tip: The dough should hold together when squeezed but not be sticky. If it's too dry, add another tablespoon of water.
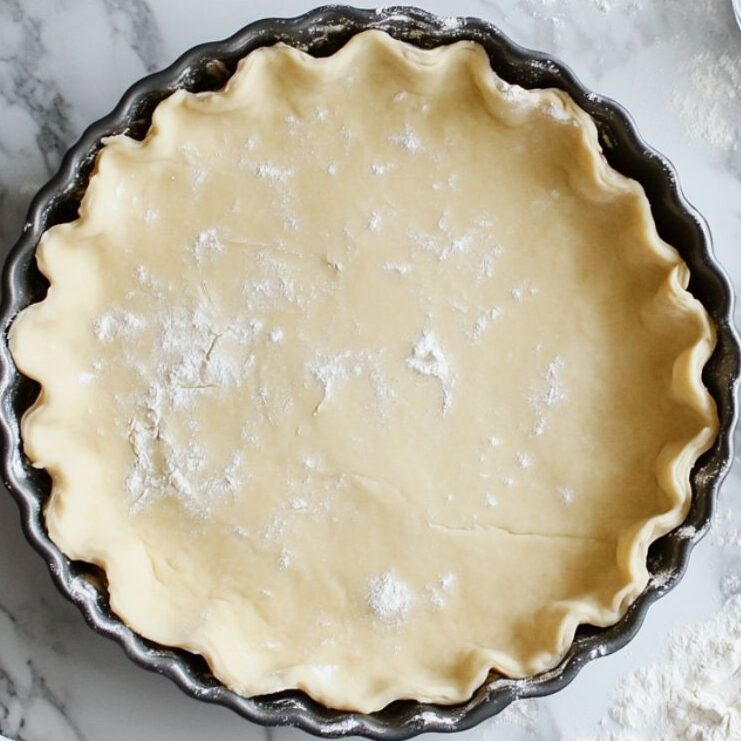
Rolling and Blind Baking
- Wrap the dough in plastic wrap and chill for at least 30 minutes. This prevents shrinking during baking. Roll the chilled dough on a lightly floured surface until it's about ⅛ inch thick and 2 inches larger than your 9-inch tart pan.
- Gently transfer the dough to your tart pan, pressing it into the corners without stretching. Trim the excess, leaving about ½ inch overhang, then fold it over to create a double-thick edge. Prick the bottom all over with a fork to prevent puffing.
- Line with parchment paper and fill with pie weights or dried beans. Bake at 375°F for 15 minutes, remove the weights and parchment, then bake another 10-12 minutes until golden brown.
Expert tip: For a crispier crust, brush the pre-baked shell with beaten egg white and bake for 2 more minutes before adding the filling.
Creating the Perfect Ganache
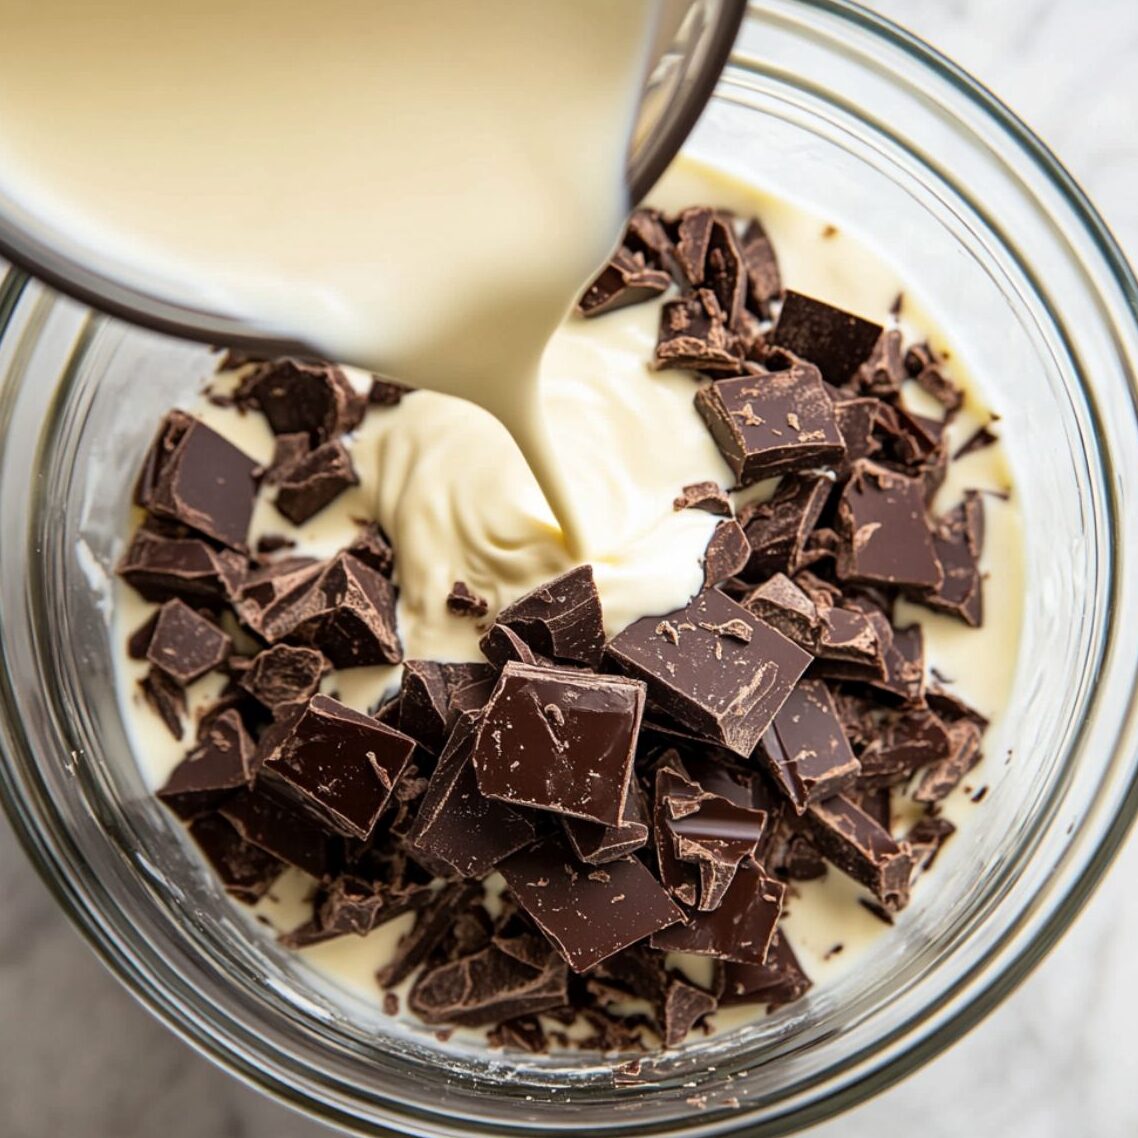
- While your crust cools, prepare the rich chocolate filling. Place chopped dark chocolate in a heatproof bowl. Heat the heavy cream in a small saucepan until it just begins to simmer – you'll see small bubbles around the edges.
- Pour the hot cream over the chocolate and let it sit for 2 minutes without stirring. This allows the chocolate to melt gently. Starting from the center, whisk in small circles, gradually working outward until the mixture is completely smooth and glossy.
- Stir in the butter, vanilla extract, and sea salt until fully incorporated. The ganache should be silky and coat the back of a spoon.
Secret tip: For extra smooth ganache, strain the mixture through a fine-mesh sieve to remove any lumps.
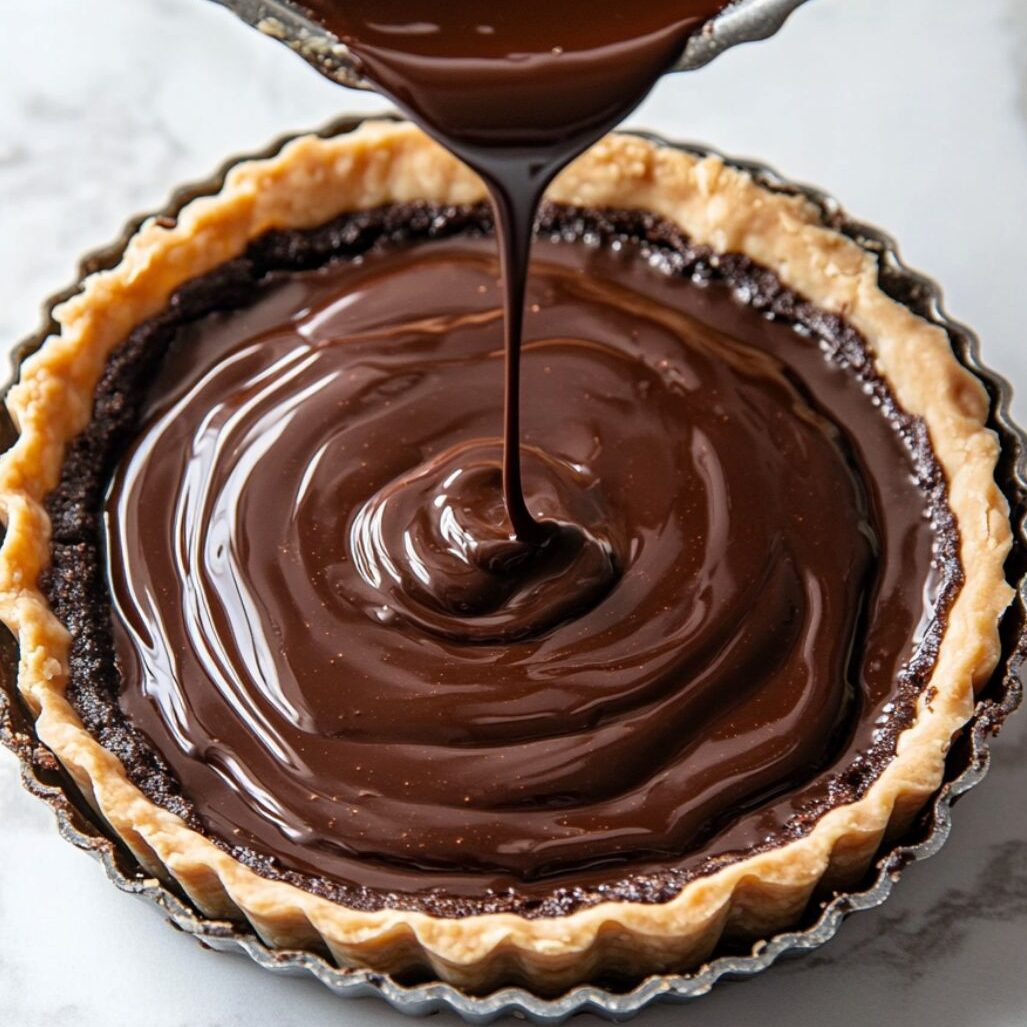
Assembly and Setting
- Pour the warm ganache into your cooled tart shell, gently tilting the pan to ensure even distribution. The filling should come right to the top of the crust. Give the pan a gentle tap on the counter to release any air bubbles.
- Refrigerate the chocolate ganache tart for at least 2 hours, or until the filling is completely set. For clean slices, chill overnight.
- Step 1: Preparing the Tart Crust
Mix flour, sugar, and butter until crumbly before adding yolk and water
- Step 2: Rolling and Blind Baking
Roll, line, and blind-bake the tart crust until golden
- Step 3: Creating the Perfect Ganach
Pour hot cream over chocolate and stir into a silky ganachee
- Step 4: Assembly and Setting
Fill the crust and chill until the ganache sets completely
Expert Cooking Tips & Tricks
- The key to a perfect chocolate custard tart lies in temperature control. Never let your cream boil when making ganache, as this can cause the chocolate to seize. If your ganache seems too thick, whisk in a tablespoon of warm cream. Too thin? Let it cool for 10 minutes before pouring.
- For those avoiding soggy tart crust issues, make sure your shell is completely cooled before adding the filling. A warm crust will cause the ganache to become too fluid and potentially leak through any small cracks.
- When slicing, use a sharp knife dipped in warm water and wiped clean between cuts. This creates those professional-looking, clean edges that make your dessert look bakery-perfect.
Recipe Variations & Dietary Modifications
Flavor Variations
Transform this basic recipe into exciting variations:
- Orange zest chocolate tart: Add 1 tablespoon fresh orange zest to the ganache
- Sea salt and chocolate tart: Sprinkle flaky sea salt on top before chilling
- Espresso chocolate tart: Add 1 tablespoon instant espresso powder to the cream
Dietary Adaptations
- Gluten-free version: Replace all-purpose flour with a 1:1 gluten-free baking flour
- Vegan chocolate tart: Use coconut cream instead of heavy cream and vegan butter
- No-bake chocolate tart: Skip the baking step and use a graham cracker crust
Equipment Recommendations
Essential tools for success include a 9-inch tart pan with removable bottom – this makes serving so much easier. A pastry cutter helps create the flakiest crust, though you can use your fingers if needed. For the ganache, a medium saucepan and heatproof bowl are crucial.
Budget-friendly alternatives include using a regular pie pan (though removal will be trickier) and a large mixing bowl instead of a specialized tart pan.
Storage & Meal Prep Tips
Refrigerator Storage
- Your finished tart will keep beautifully in the refrigerator for up to 5 days. Cover loosely with plastic wrap, being careful not to touch the surface of the ganache.
Freezing Instructions
- The baked tart crust can be frozen for up to 3 months. Wrap tightly in plastic wrap and aluminum foil. The completed tart can also be frozen for up to 1 month – thaw overnight in the refrigerator before serving.
Make-Ahead Tips
- This is an ideal make-ahead dessert. Prepare the entire tart up to 2 days in advance. The flavors actually improve as they meld together, and the texture becomes even more silky. for X days/weeks/months.
The Sweet Secret Behind My Go-To Chocolate Tart Recipe
I still remember the first time I made this Chocolate Tart Recipe—it was the night before my sister’s engagement dinner, and I needed a dessert that felt elegant but wasn’t fussy. I had no time for trial and error, so I turned to an old scribbled note from my grandmother: “Let the ganache rest before you stir; chocolate rewards patience.”
That quiet little secret changed everything. The ganache turned out smooth and glossy, the crust perfectly crisp, and the tart stole the show. Since then, this Chocolate Tart Recipe has been my not-so-secret weapon for every special occasion—and now, it’s yours too.
FAQ
What is the difference between chocolate pie and chocolate tart recipe?
A chocolate pie usually has a softer, more custard-like filling and is often made with a flaky pie crust. A chocolate tart uses a firmer shortcrust pastry and typically features a rich ganache filling with a more elegant presentation.
What is the difference between a chocolate torte and a tart?
A chocolate torte is a dense, flourless (or low-flour) cake made with eggs and ground nuts, while a chocolate tart has a crisp pastry base and a creamy ganache filling. Tortes are baked like cakes; tarts are more like open-faced pastries.
What is in a chocolate tart recipe ?
A chocolate tart recipe typically contains a buttery shortcrust pastry base filled with a silky ganache made from chocolate and cream. Some versions may include butter, eggs, or flavor add-ins like vanilla, sea salt, or espresso.
How to make filling for chocolate tart?
To make chocolate tart filling, heat heavy cream until just simmering, then pour it over chopped chocolate. Let it sit, stir until smooth, and optionally blend in butter or flavorings before pouring into the tart shell to set.
A Must-Try Chocolate Tart Recipe You’ll Keep Coming Back To
This Chocolate Tart Recipe is the kind of dessert that proves you don’t need complicated steps to wow your guests. With its buttery crust and smooth ganache, it’s the perfect balance of ease and elegance—ideal for holidays, birthdays, or just when you want something special.
If you’re craving more sweet inspiration after trying this Chocolate Tart Recipe, you’ll also love our Strawberry Cake Recipe and Banana Pudding Recipe—both are just as simple and crowd-pleasing.
Go ahead and give this Chocolate Tart Recipe a try; then come back and tell us how it went. We’d love to see your creations—especially your own twists like fresh raspberries or caramel drizzle. Don’t forget to rate the recipe and drop your photos in the comments; I can’t wait to see what you bake up!
Related
Looking for other recipes like this? Try these:
Pairing
These are my favorite dishes to serve with Chocolate Tart Recipe

Chocolate Tart Recipe
Equipment
- 1 9-inch tart pan with removable bottom Preferably with removable bottom for easy release
- 1 Medium saucepan To heat heavy cream gently
- 1 Mixing bowls (glass preferred) For making the tart crust
- 1 Pastry cutter or fork To cut cold butter into the flour
- 1 Rolling Pin For rolling out the shortcrust pastry
- 1 Parchment paper For blind baking the crust
- 1 Pie weights or dried beans Or dried beans, to prevent puffing during baking
Ingredients
Tart Crust
- 1.5 cups all-purpose flour
- 0.5 cup unsalted butter cold and cubed
- 0.25 cup powdered sugar
- 1 large egg yolk
- 2–3 tablespoon ice water as needed to form the dough
Chocolate Ganache Filling
- 8 oz dark chocolate chopped, 60–70% cocoa recommended
- 1 cup heavy cream
- 2 tablespoon unsalted butter
- 1 teaspoon vanilla extract
- 1 pinch sea salt
Instructions
- Whisk flour and sugar, then cut in butter until crumbly.
- Add yolk and ice water to form dough; don’t overmix.
- Wrap and chill dough 30 mins; roll out and fit into tart pan.
- Line with parchment and weights; bake at 375°F for 25 minutes.
- Simmer cream just until bubbling around edges.
- Pour cream over chocolate; let sit 2 minutes, then stir.
- Add butter, vanilla, and salt; mix until smooth and glossy.
- Pour ganache into cooled crust and tap to remove air bubbles.
- Refrigerate at least 2 hours or overnight until fully set.
Notes
- Nutrition information is automatically calculated, so should only be used as an approximation.

Leave a Reply