
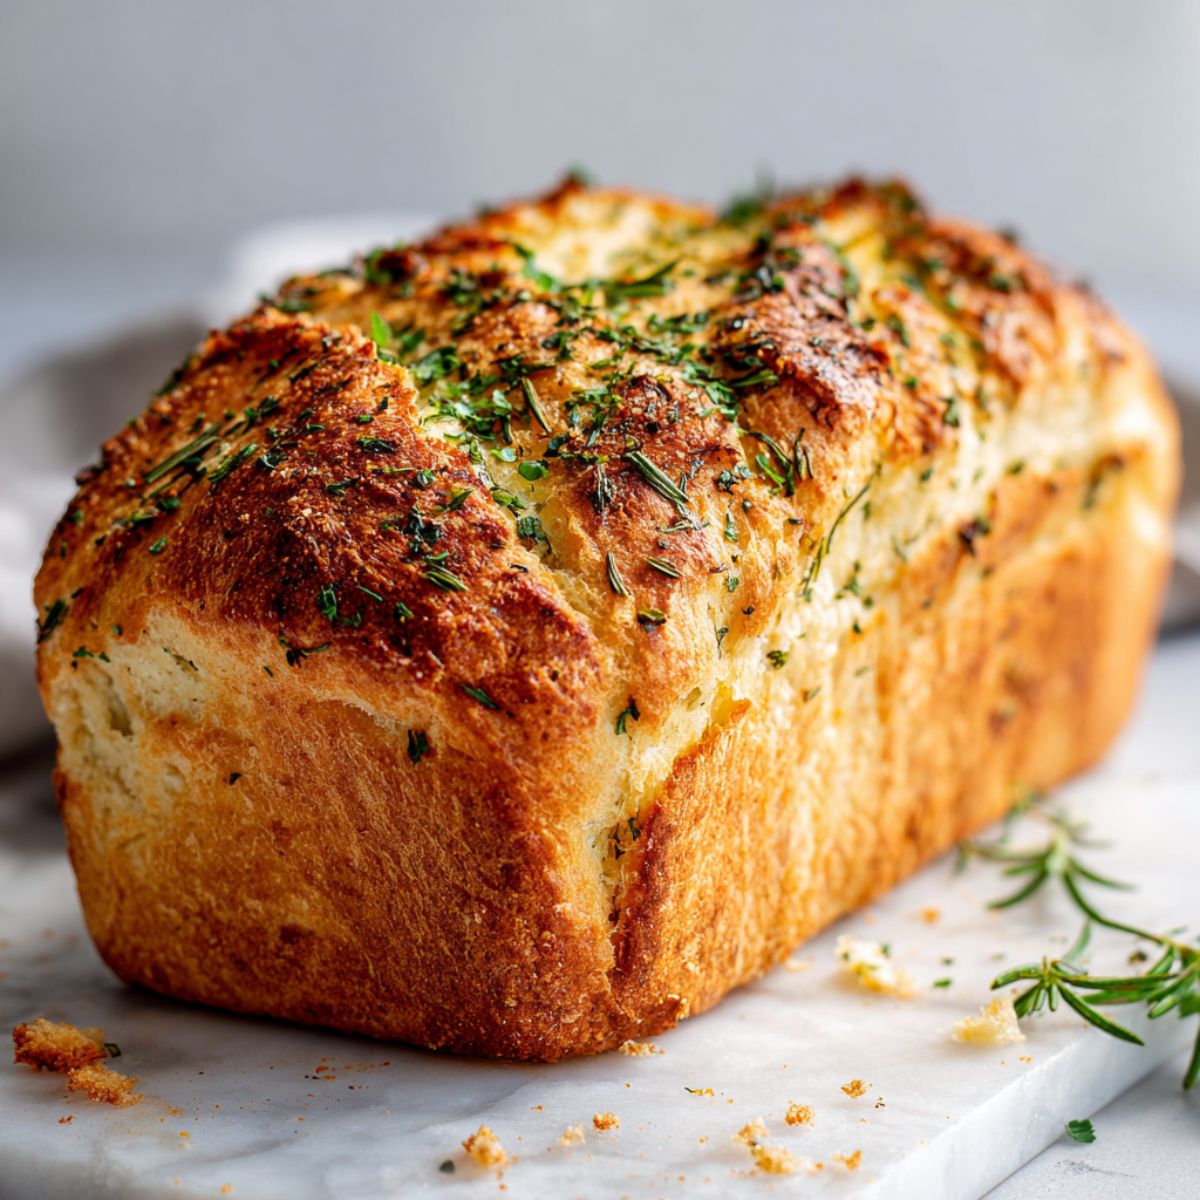
There's something magical about pulling a warm loaf of Garlic Herb Bread Recipe from your oven. The aroma fills every corner of your home, and that first bite; soft, buttery, packed with flavor, makes everything worth it. I've been baking this Garlic Herb Bread Recipe for years, and it never gets old.
What I love most? You don't need fancy equipment or professional skills. This Garlic Herb Bread Recipe uses simple ingredients you probably already have. Whether you're serving it for breakfast with eggs, alongside pasta, with soup, or just enjoying it with butter, this bread wins every time. Trust me, once you try this Garlic Herb Bread Recipe, store-bought will feel like a distant memory.
Why This Bread Changes Everything
Listen, I get it. Homemade bread sounds intimidating. But this rustic garlic herb quick bread breaks all the rules in the best way. Unlike traditional yeast breads that require hours of rising and kneading, this fresh baked garlic bread recipe comes together quickly. The secret? A no-knead method that still delivers bakery-quality results.
The combination of fresh herbs, roasted garlic butter bread flavors, and a perfectly crispy crust makes this Italian garlic herb bread absolutely irresistible. I started making this Garlic Herb Bread Recipe when I wanted something special for dinner parties, but it became my go-to for regular weeknight meals too. The rosemary garlic loaf variation is my personal favorite, though the parsley and garlic bread version runs a close second. This Garlic Herb Bread Recipe adapts to whatever you're craving, and that's what makes it so special.
Jump to:
Ingredients
For the Bread Dough
- all-purpose flour
- sugar
- instant yeast
- salt
- warm water
- olive oil
For the Garlic Herb Mixture
- melted butter
- garlic, minced
- fresh rosemary, chopped (or dried)
- fresh parsley, chopped
- fresh oregano
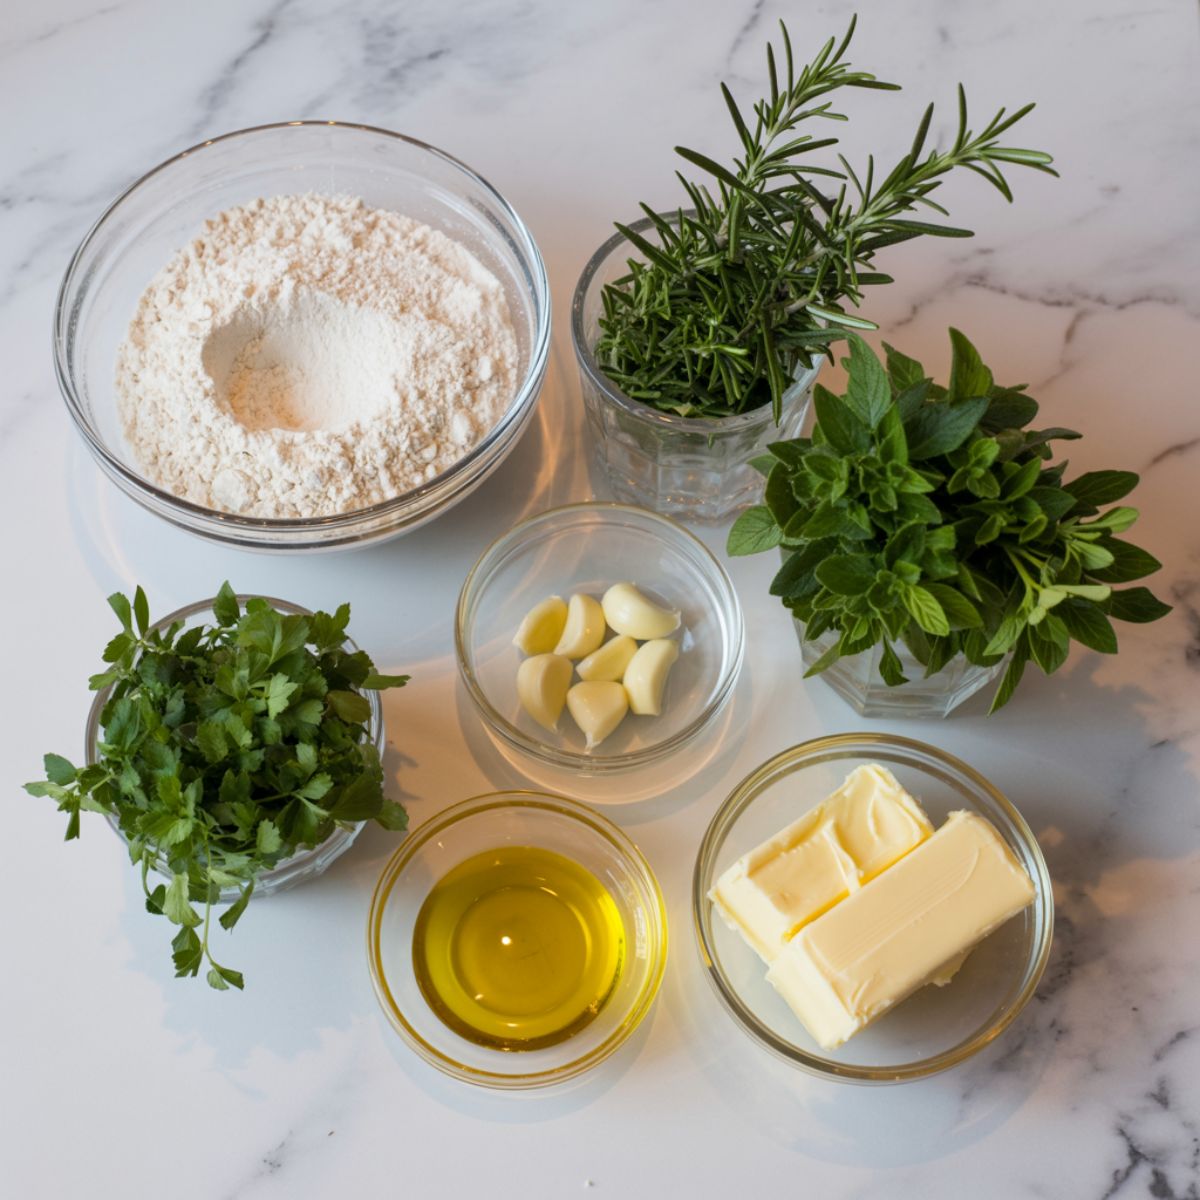
See recipe card for quantities.
Instructions
Prepare Your Dough Base
- Mix flour, sugar, yeast, and salt in a large mixing bowl until combined.
- Create a well in the center and pour in warm water and olive oil.
- Stir with a wooden spoon until a shaggy dough forms (about 2 minutes).
- Cover the bowl with a damp kitchen towel and let it rest for 10 minutes.
This resting period lets the flour hydrate fully, making your easy bread with garlic softer and easier to work with.
Create the Garlic Herb Mixture
- Combine minced garlic, rosemary, parsley, and oregano in a small bowl.
- Pour melted butter over the herbs and stir until well mixed.
- Set aside half of this mixture for brushing on top later.
- Fold the remaining half into your rested dough gently.
The key here is not overmixing. You want pockets of garlicky goodness throughout your oven-baked garlic bread.
Shape and Rise
- Transfer dough to a greased 9x5-inch loaf pan or shape into a round on a baking sheet.
- Press the dough down gently to fill the corners if using a loaf pan.
- Cover again and let rise in a warm spot for 30-40 minutes (dough should nearly double).
- Preheat your oven to 375°F during the last 10 minutes of rising.
For extra crusty herb bread, place a shallow pan of water on the bottom oven rack. The steam creates that perfect crust.
Bake to Golden Perfection
- Remove from oven and brush with additional butter if you want extra richness.
- Brush the risen dough with remaining garlic herb butter mixture generously.
- Score the top with a sharp knife (3-4 diagonal slashes look beautiful).
- Bake for 35-40 minutes until golden brown and internal temperature reaches 190°F.
Expert Cooking Tips
- Temperature Matters Check your water temperature with a thermometer. Too hot (over 120°F) kills the yeast. Too cold (under 100°F) and your yeast bread with herbs won't rise properly. Sweet spot is 105-110°F, which feels like warm bathwater on your wrist.
- Herb Freshness Fresh herbs make a huge difference in this flavorful herb bread for dinner. If you must use dried, remember the 3:1 ratio (three parts fresh equals one part dried). Always add dried herbs to your butter mixture first so they rehydrate slightly before going into the dough.
- Don't Skip the Rest That 10-minute rest after initial mixing isn't optional. It's called autolyse, and it makes your soft garlic bread infinitely better. The flour absorbs water fully, gluten develops naturally, and you get better texture without aggressive kneading.
- Garlic Intensity Want milder garlic flavor? Roast your garlic cloves whole in the oven for 20 minutes at 400°F before mincing. This turns sharp garlic into sweet, caramelized goodness that won't overpower your aromatic bread loaf.
- The Knock Test Professional bakers tap the bottom of their bread to check doneness. A fully baked loaf sounds hollow, like tapping a drum. If it sounds dull or dense, give it another 5 minutes in the oven.
- Cooling Patience I know it's hard, but let your bread cool for at least 15 minutes before slicing. Cutting too early releases steam and makes the interior gummy. Your patience pays off with perfect texture.
Recipe Variations & Substitutions
Cheesy Garlic Herb Loaf
- Fold in 1 cup shredded mozzarella or cheddar cheese after adding your herb mixture. The cheese melts into pockets throughout the bread, creating a cheesy garlic herb bread that's absolutely addictive. Add a handful of parmesan on top before baking for extra golden crust.
No-Knead Version
- For a true no knead garlic herb bread, increase water to 1¼ cups and let the dough rise for 12-18 hours in the refrigerator. This slow fermentation develops incredible flavor complexity. Shape cold dough gently and let it come to room temperature for 30 minutes before baking.
Pull-Apart Style
- Instead of a loaf pan, divide dough into 12 equal pieces. Roll each into a ball, dip in garlic butter mixture, and layer in a bundt pan. After baking, you'll have pull apart garlic herb bread that's perfect for sharing at dinner parties.
Whole Wheat Option
- Replace up to half the all-purpose flour with whole wheat flour for nuttier flavor and extra fiber. Add 2 tablespoons extra water since whole wheat absorbs more liquid. Your bread will be denser but incredibly satisfying as a side dish bread recipe.
Focaccia Style
- Press dough into a rimmed baking sheet instead of shaping a loaf. Dimple the surface with your fingertips, drizzle generously with olive oil and herb mixture, then bake at 400°F for 25 minutes. This creates a garlic herb focaccia bread recipe with crispy edges and soft center.
Equipment Recommendations
- 9x5-inch loaf pan ; creates the classic loaf shape and ensures even baking throughout
- Digital instant-read thermometer ; takes the guesswork out of checking doneness (190°F internal temp)
- Stand mixer with dough hook (optional) ; makes mixing easier but not required for this recipe
- Sharp serrated bread knife ; gives you clean slices without squashing your soft loaf
- Kitchen scale ; measuring flour by weight (360g for 3 cups) ensures consistent results every time
- Pastry brush ; perfect for applying garlic butter evenly across the surface
Budget-friendly alternatives: A regular mixing bowl and wooden spoon work perfectly fine. Use a regular knife carefully if you don't have serrated. Any similar-sized baking dish works if you don't have a standard loaf pan.
Storage & Meal Prep Tips
Room Temperature Storage
- Keep your bread in a paper bag or bread box for up to 3 days. Plastic bags make the crust soft, while paper maintains that perfect crispy herb bread exterior. Slice only what you need to keep the rest fresh longer.
Refrigerator Storage
- Not recommended for this recipe. Refrigeration actually makes bread stale faster through a process called retrogradation. Room temperature or freezing are your best options for this bread for pasta dinner.
Freezing Instructions
- Slice the cooled loaf completely, then wrap tightly in plastic wrap followed by aluminum foil. Freeze for up to 3 months. To reheat, unwrap and toast slices directly from frozen, or thaw the wrapped loaf at room temperature for 2 hours. Refresh in a 350°F oven for 10 minutes to restore that fresh-baked texture.
Make-Ahead Dough
- Mix your dough, complete the first rise, then punch down and refrigerate in an airtight container for up to 24 hours. When ready to bake, shape the cold dough, let it rise at room temperature for 45-60 minutes, then proceed with baking as directed.
Grandma's Secret That Changed Everything
Here's what my grandmother taught me that transformed my garlic herb toast forever: add a tablespoon of honey to your garlic butter mixture. Sounds weird with savory ingredients, right? But that tiny bit of sweetness balances the sharp garlic and creates incredible caramelization on the crust. The sugars in honey brown beautifully in the oven, giving you a gorgeous golden color and subtle complexity that makes people ask, "What's different about this Garlic Herb Bread Recipe?"
Another secret she swore by: let your sliced garlic sit in the melted butter for 5 minutes before adding herbs. This gentle heat takes the raw edge off the garlic without cooking it completely, mellowing the flavor while infusing the butter deeply. These two tiny tweaks make the difference between good bread and extraordinary Garlic Herb Bread Recipe that people remember and request by name.
FAQ
What is crusty Garlic Herb bread?
Crusty garlic herb bread refers to any bread made with garlic and herbs that has a firm, golden-brown exterior while maintaining a soft interior. The crust develops through high oven heat and steam during baking. Our Garlic Herb Bread Recipe achieves this perfectly by baking at 375°F and using an optional water pan for steam.
Do I need Thyme to make garlic bread?
No, thyme isn't required for garlic bread. Traditional recipes use rosemary, parsley, and oregano like in this Garlic Herb Bread Recipe. Thyme adds a lovely earthy note if you enjoy it, but it's completely optional. Feel free to adjust herbs based on your taste preferences and what's available in your kitchen.
What herbs should I use for garlic bread?
The classic combination includes rosemary, parsley, and oregano as used in this Garlic Herb Bread Recipe. Basil adds sweetness, thyme brings earthiness, and chives offer mild onion flavor. Fresh herbs taste brighter, but dried works too. Start with the basic trio in our recipe, then experiment with additions once you've mastered it.
How do you make garlic bread without a knead?
Skip the kneading by using a wetter dough and longer rise time. Increase water by ¼ cup and let dough rise for 12-18 hours in the refrigerator. The extended time allows gluten to develop naturally without kneading. Our Garlic Herb Bread Recipe only requires gentle folding, making it beginner-friendly and nearly no-knead already.
Perfect Pairings Worth Trying
Now that you've mastered this Garlic Herb Bread Recipe, you'll want other crowd-pleasers to round out your menu. My Cheesy Cornbread Recipe brings sweet and savory together beautifully; it's perfect alongside chili or barbecue when you want something different from traditional garlic bread. The slight sweetness complements spicy dishes wonderfully.
For breakfast or brunch, try my Orange Bread Recipe which offers a completely different flavor profile. The citrus brightness and tender crumb make it ideal for morning coffee or afternoon tea. Both recipes use similar techniques to this Garlic Herb Bread Recipe, so you'll find them just as approachable. Once you start baking fresh bread regularly, you'll wonder why you ever bought store-bought. These three recipes cover savory dinners, comfort food sides, and sweet morning treats, giving you a complete bread-baking foundation that'll impress everyone at your table.
With love-By Lisa Johnson 🍞
Related
Looking for other recipes like this? Try these:


Pairing
These are my favorite dishes to serve with Garlic Herb Bread Recipe


Garlic Herb Bread Recipe
Equipment
- 1 9x5 inch loaf pan For classic loaf shape
- 1 Digital instant-read thermometer Ensures bread reaches 190°F internal temp
- 1 Stand mixer with dough hook Optional, for easier mixing
- 1 Sharp serrated bread knife For clean slicing
- 1 Kitchen scale 360g flour for accuracy
- 1 Pastry brush To apply garlic butter evenly
Ingredients
Bread Dough
- 3 cups All-purpose flour Provides structure
- 1 tablespoon Sugar Feeds yeast & adds subtle sweetness
- 2 teaspoon Instant yeast For rise
- 1 teaspoon Salt Balances flavor
- 1 cup Warm water 110°F, activates yeast
- 3 tablespoon Olive oil Keeps bread moist & tender
Garlic Herb Mixture
- 4 cloves Garlic, minced Star flavor
- 2 tablespoon Fresh rosemary Or 1 tablespoon dried
- 2 tablespoon Fresh parsley For freshness & color
- 1 tablespoon Fresh oregano Adds Italian flavor
- 4 tablespoon Butter, melted Rich, golden flavor
Instructions
- Combine flour, sugar, yeast, salt, warm water, and olive oil in a bowl. Rest for 10 minutes.
- Mix garlic, herbs, and melted butter. Fold half of mixture into dough.
- Shape dough into loaf, place in greased 9x5-inch pan, let rise 30–40 minutes while preheating oven.
- Brush with remaining butter mixture, score top, and bake at 375°F for 35–40 minutes.
- Cool for 15 minutes before slicing with a serrated bread knife.
Notes
- Nutrition information is automatically calculated, so should only be used as an approximation.


Leave a Reply